I confirm that the work on this website is all my own and does not include any work completed by anyone other then myself, except where clearly stated otherwise, and that sources have been appropriately referenced.
Initial Concept
The concept of my final project is to produce a one-shot film that can stand alongside other long take films, in providing my audience with a thoroughly immersive experience. I aim to do this by developing the audience’s connection with my main character by demonstrating his personality, from the beginning, and immersing the viewer in his adventure.
As this is the first time I am attempting to produce my own one-shot film, I am keeping in mind that I may just use the technique for my first sequence; the opening scene and until he finds the bag full of money.
Filming a mountain bike chase scene may be challenging as a one-shot. I will try and film with the technique but, I am open to filming this scene in a traditional way, as this will allow me to implement a first-person view of the chase.
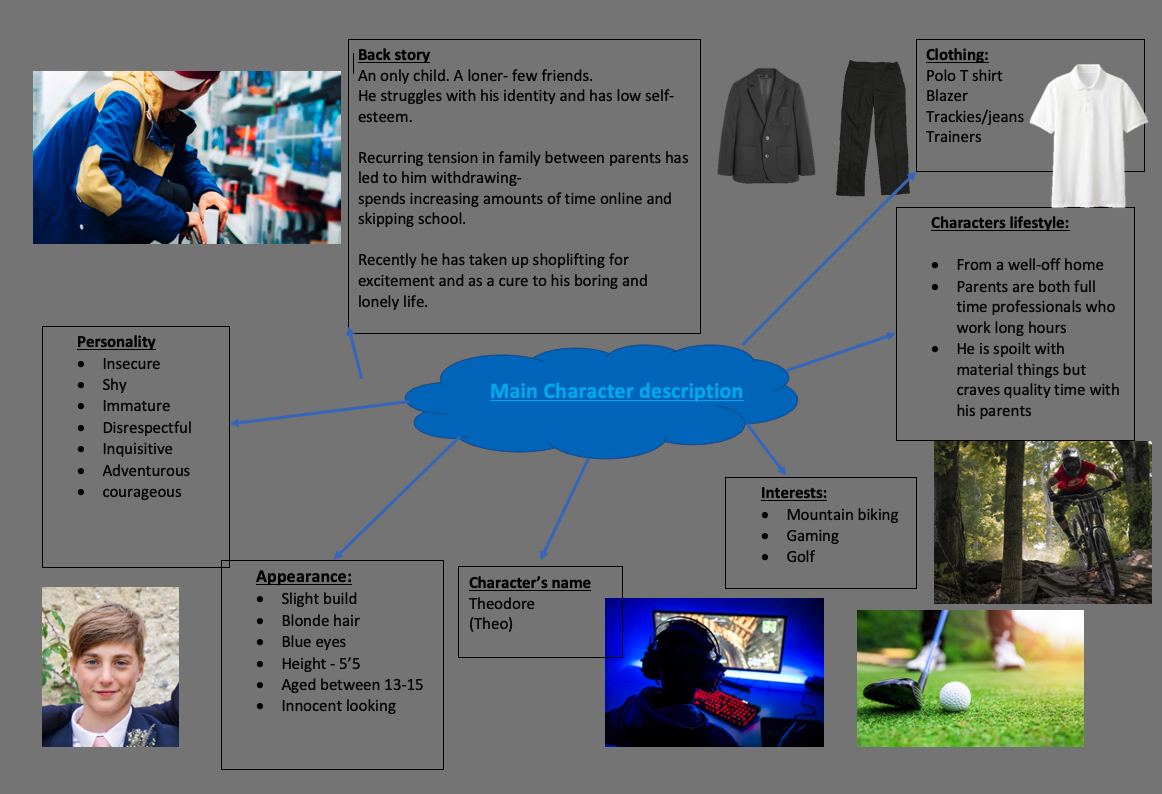
Characters – Main character
The main character is a cheeky, teenage boy aged 14 . He comes from a well-off background and attends a private school. He often misses school to go mountain biking near his home. He has an adventurous spirit, and his curiosity often gets him into trouble. He has little respect for others or the environment however, he does have a softer side to his personality and can be insecure in certain situations.
Two Unknown Characters-
The first unknown character is aged in his late forties. He will be seen to be wearing dark clothes and sturdy boots. The second unknown character is in his late teens and wears dark clothing and trainers.Both these unknown characters portray a menacing/threatening element towards the main character in the film.
The concept of my final project is to produce a one-shot film that can stand alongside other long take films, in providing my audience with a thoroughly immersive experience. I aim to do this by developing the audience’s connection with my main character by demonstrating his personality, from the beginning, and immersing the viewer in his adventure.
As this is the first time I am attempting to produce my own one-shot film, I am keeping in mind that I may just use the technique for my first sequence; the opening scene and until he finds the bag full of money.
Filming a mountain bike chase scene may be challenging as a one-shot. I will try and film with the technique but, I am open to filming this scene in a traditional way, as this will allow me to implement a first-person view of the chase.
Characters – Main character
The main character is a cheeky, teenage boy aged 14 . He comes from a well-off background and attends a private school. He often misses school to go mountain biking near his home. He has an adventurous spirit, and his curiosity often gets him into trouble. He has little respect for others or the environment however, he does have a softer side to his personality and can be insecure in certain situations.
Two Unknown Characters-
The first unknown character is aged in his late forties. He will be seen to be wearing dark clothes and sturdy boots. The second unknown character is in his late teens and wears dark clothing and trainers.Both these unknown characters portray a menacing/threatening element towards the main character in the film.


Alternate ideas to consider after talking to actors and audience for feedback.
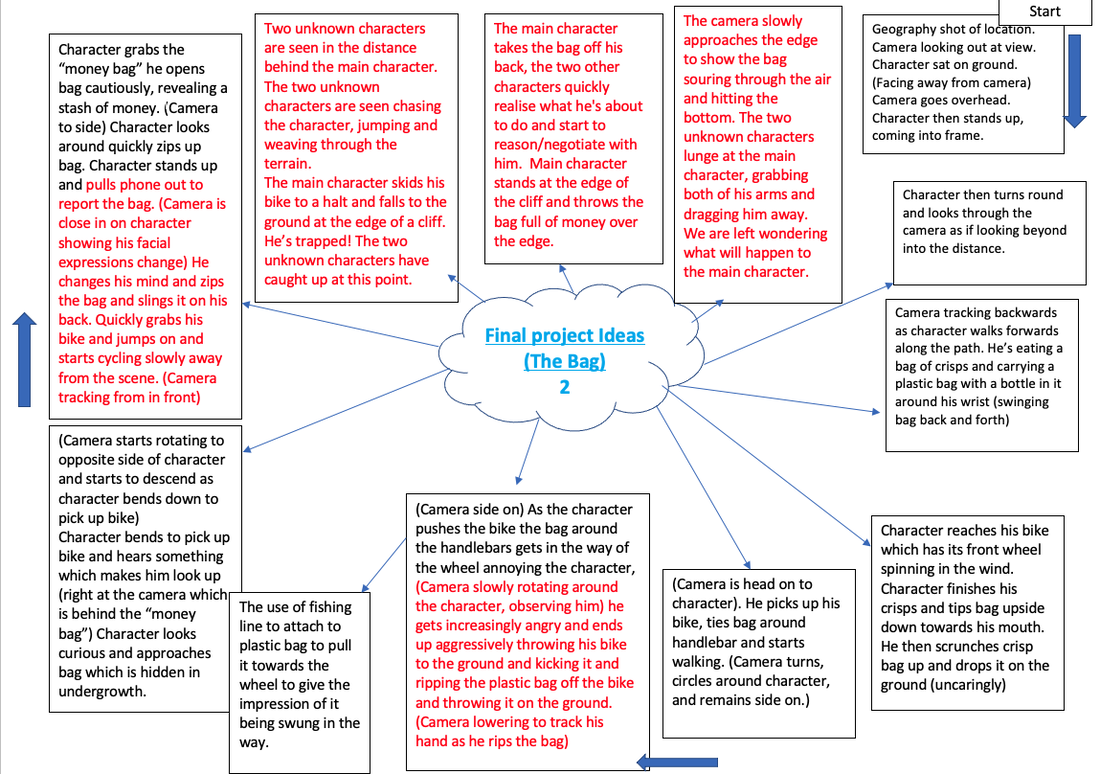
Final Mind Map of 'The Bag' storyline
After undertaking a location recce, taking test shots and walking through ideas, as well as discussing my plan with others, and taking on board advise, I have altered my second plan.
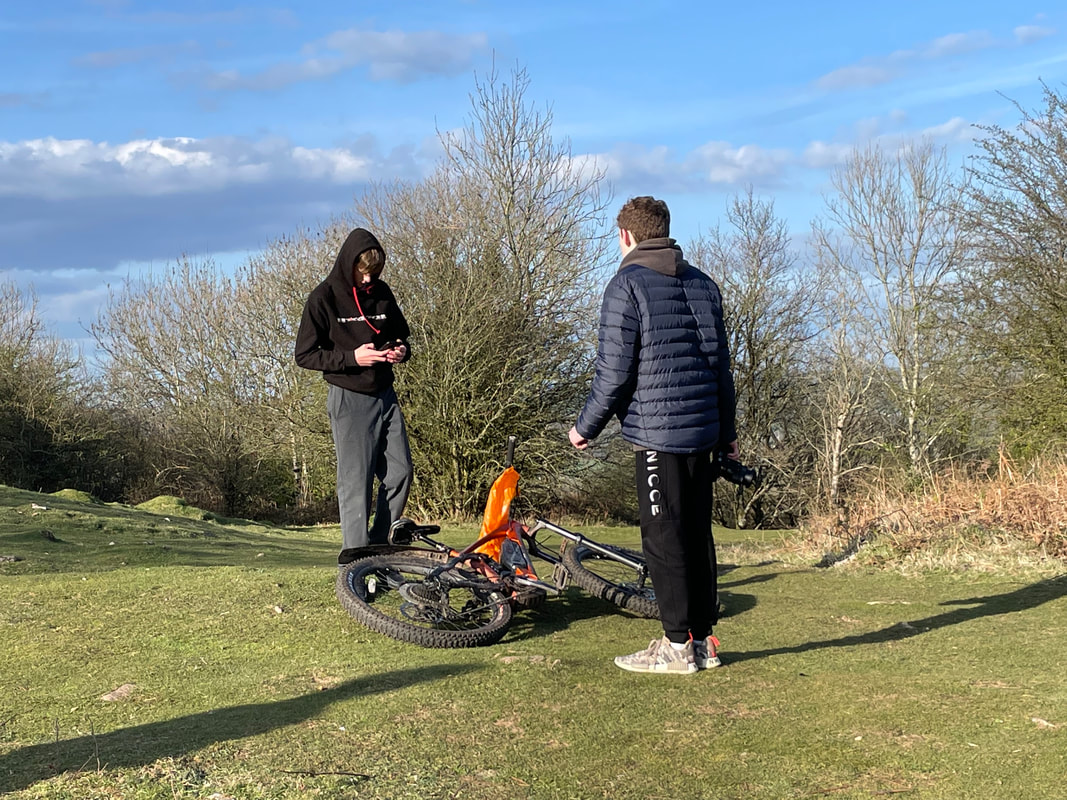
One of the main changes to my plan was to take out the mountain bike chase scene. After listening to feedback from tutors and some of my audience, I realised that switching away from a one-take, to a GoPro film of the mountain bike chase, would not be right. It would be technically challenging but also going away from my original focus of producing a one-shot film. It would also be difficult to match the two types of filming.
I feel my final plan is a cohesive solution which includes all the best elements of my ideas but, is adapted to suit the location, actor availability and to take into account technical issues.
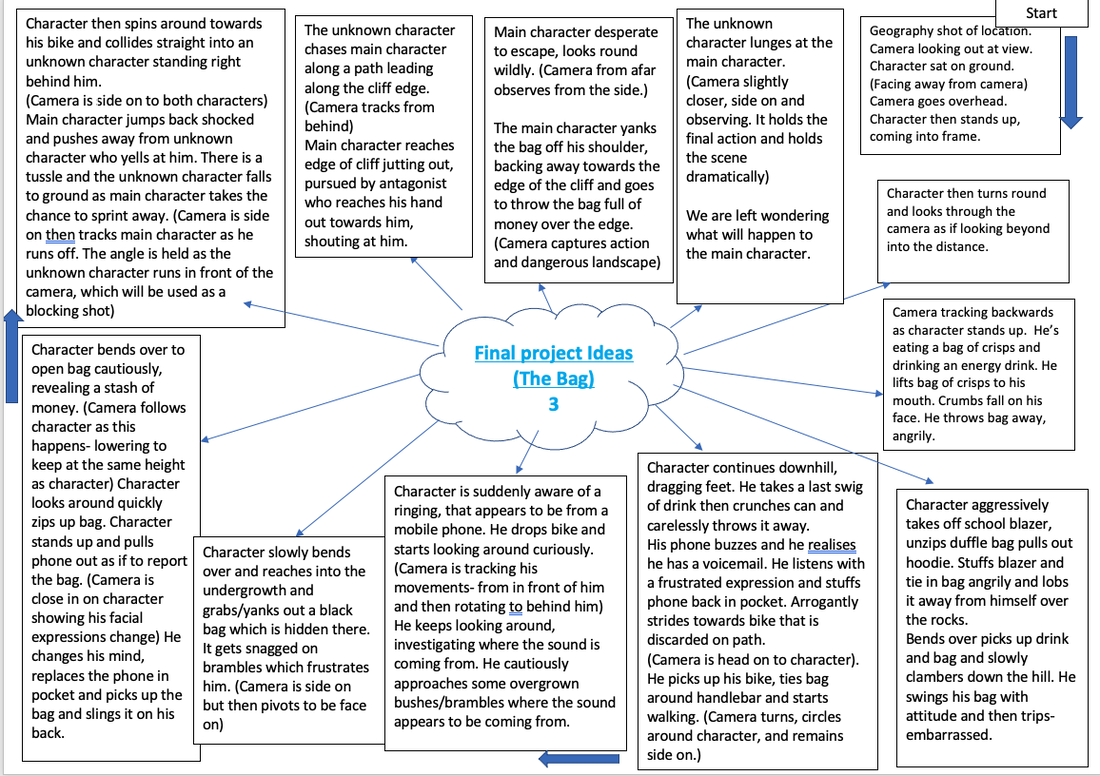
Final outline of the story
The story revolves around a young teenage boy who has few friends and is an only child. He has become disengaged with school and often skips lessons. He has increasingly isolated himself from his friends and family and feels he doesn’t belong.
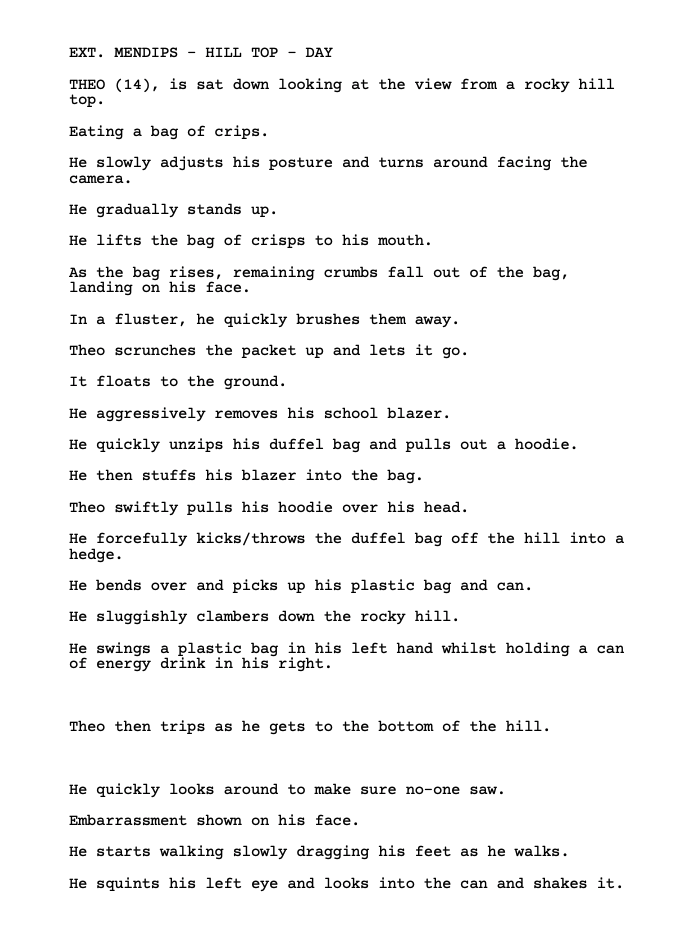
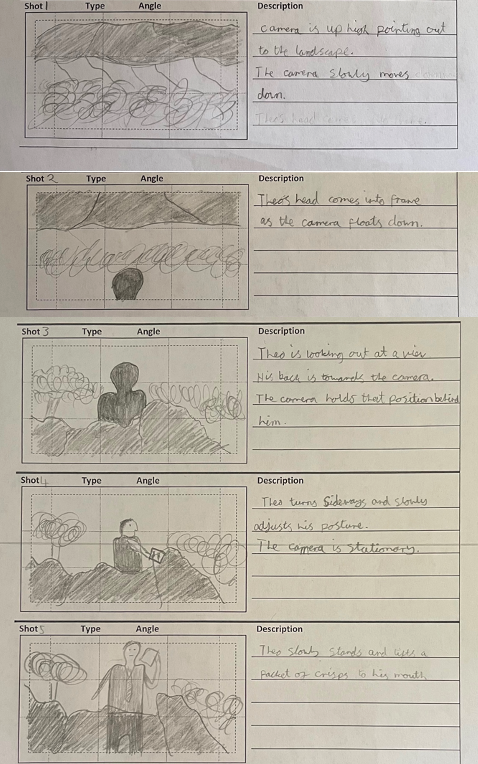
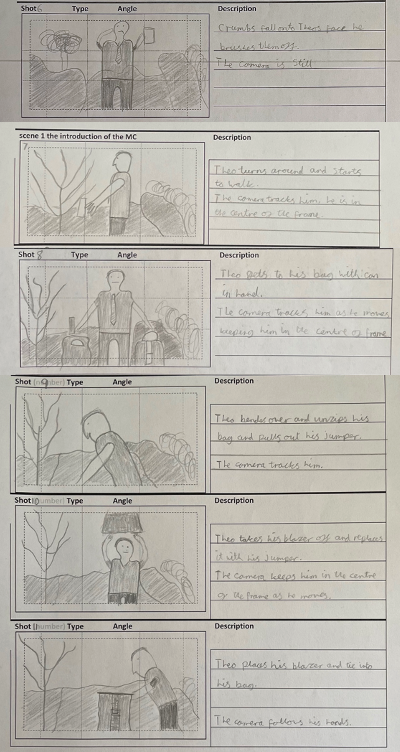
The story starts with the main character, Theo, sitting eating a bag of crisps on top of a rocky outcrop, in an isolated spot in the Mendips. At first, Theo seems to be at peace, but it is soon evident that he is unhappy and fed up with life. Theo makes a decision as he leaves the look out spot, taking off his blazer and tie, shoving them in a bag and angrily throwing the bag away from himself. He puts on a ‘hoodie’ and slowly descends the hill looking frustrated but with a plan to run away in his mind.
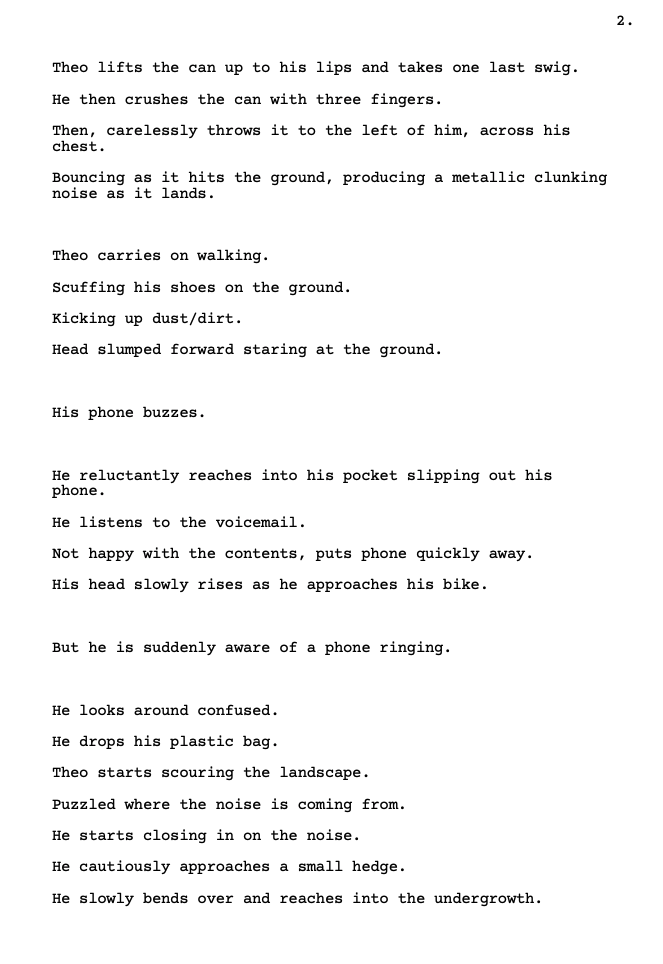
A voicemail from a mate, asking where he is, frustrates him further and Theo grabs hold of his discarded bike ready to leave. However, he hears a phone ringing from somewhere near, distracted he begins searching for the mystery phone.
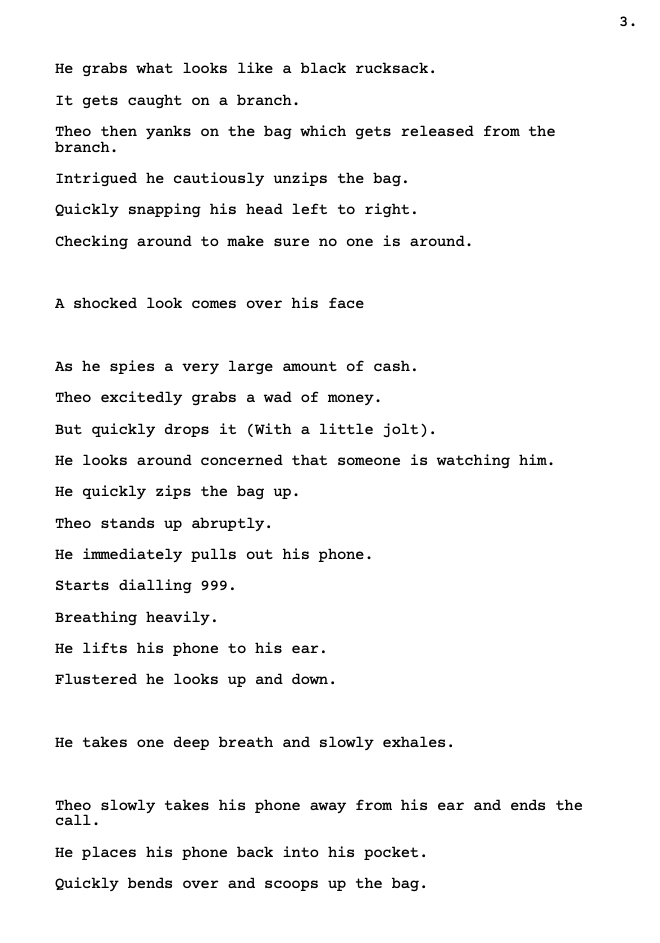
Theo’s search leads him to an overgrown area and peering in, he spies a black duffle bag. With difficulty Theo pulls the bag out from its hiding place and slowly opens the bag to reveal huge amounts of cash and the mobile phone. It is likely to be County Lines money that has been stolen or dropped off for collection by gang members.
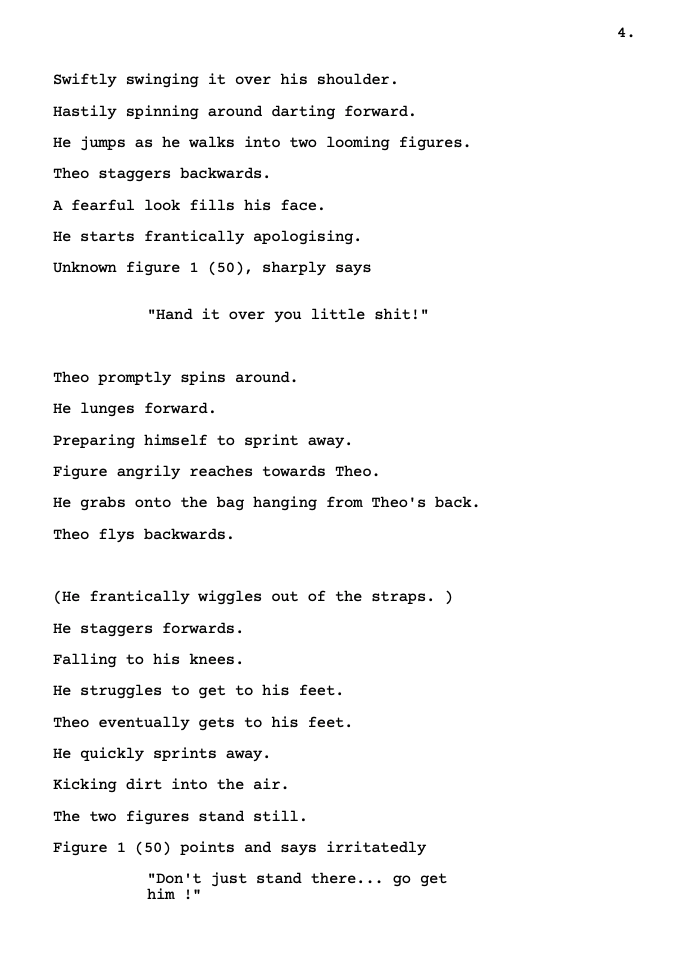
Theo is clearly shocked and immediately takes his mobile phone out of his pocket to report the bag of cash. But suddenly Theo loses his morals and decides to keep the money for himself, checking that no one has seen him with the bag he quickly zips it up and slings it on his shoulder, ready to cycle off with it. However, as he turns around, he collides with an unknown man standing in his way.
A tussle begins as the man tries to retrieve the bag of cash off Theo. Theo manages to push the man on to the floor and sprints away across the barren landscape. It looks as if Theo has escaped but unfortunately, he runs straight towards a steep cliff edge and there is nowhere left to run.
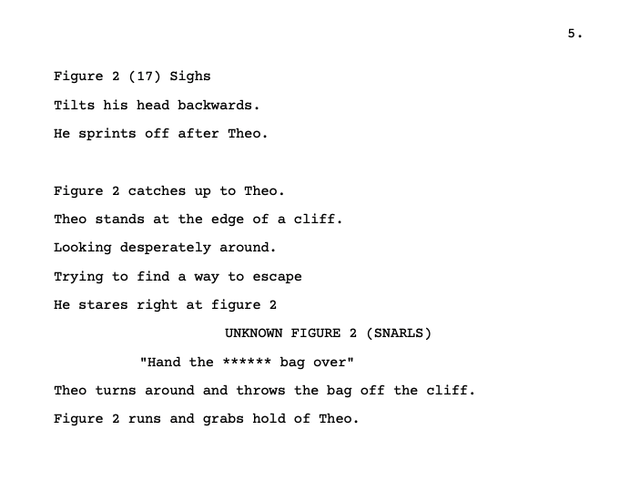
The man catches up with Theo and demands to have the bag back. Theo backs towards the very edge of the cliff with the bag of cash swinging precariously. The man lunges towards Theo and the story ends on a virtual cliff hanger!
Does Theo throw the bag? Is the man able to stop Theo throwing the bag? What will the man do next? What will happen to Theo?
The story revolves around a young teenage boy who has few friends and is an only child. He has become disengaged with school and often skips lessons. He has increasingly isolated himself from his friends and family and feels he doesn’t belong.
The story starts with the main character, Theo, sitting eating a bag of crisps on top of a rocky outcrop, in an isolated spot in the Mendips. At first, Theo seems to be at peace, but it is soon evident that he is unhappy and fed up with life. Theo makes a decision as he leaves the look out spot, taking off his blazer and tie, shoving them in a bag and angrily throwing the bag away from himself. He puts on a ‘hoodie’ and slowly descends the hill looking frustrated but with a plan to run away in his mind.
A voicemail from a mate, asking where he is, frustrates him further and Theo grabs hold of his discarded bike ready to leave. However, he hears a phone ringing from somewhere near, distracted he begins searching for the mystery phone.
Theo’s search leads him to an overgrown area and peering in, he spies a black duffle bag. With difficulty Theo pulls the bag out from its hiding place and slowly opens the bag to reveal huge amounts of cash and the mobile phone. It is likely to be County Lines money that has been stolen or dropped off for collection by gang members.
Theo is clearly shocked and immediately takes his mobile phone out of his pocket to report the bag of cash. But suddenly Theo loses his morals and decides to keep the money for himself, checking that no one has seen him with the bag he quickly zips it up and slings it on his shoulder, ready to cycle off with it. However, as he turns around, he collides with an unknown man standing in his way.
A tussle begins as the man tries to retrieve the bag of cash off Theo. Theo manages to push the man on to the floor and sprints away across the barren landscape. It looks as if Theo has escaped but unfortunately, he runs straight towards a steep cliff edge and there is nowhere left to run.
The man catches up with Theo and demands to have the bag back. Theo backs towards the very edge of the cliff with the bag of cash swinging precariously. The man lunges towards Theo and the story ends on a virtual cliff hanger!
Does Theo throw the bag? Is the man able to stop Theo throwing the bag? What will the man do next? What will happen to Theo?
Presentation
Colour palette
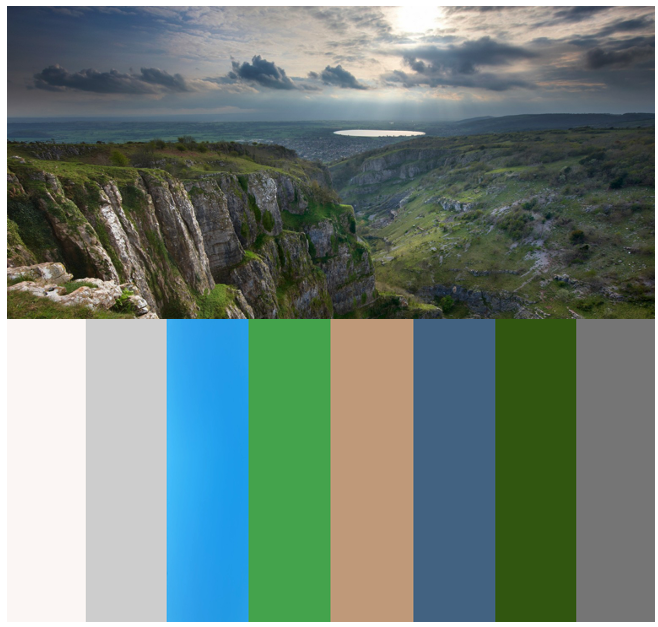
For my colour palette I wanted quite natural colours to try and convey the bleakness and remoteness of the location in which my film was located. By using these colours, which are dull and not vibrant as such, I also wanted to enhance the feeling of my main character being isolated and in a difficult place emotionally.
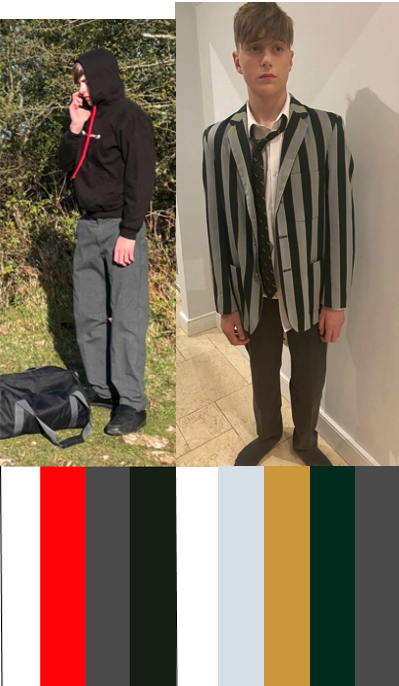
Colour palette of Theo
Colour palette
For the colour palette of my main character I wanted colours that would reflect his emotional state and mood. The black of the hoodie matched his emotions concerning school and his life; his mood was dark and so were the colour of his clothes. I also felt that the pop of red on the hoodie reflected the anger and frustration my character was feeling at the time. If I had used a colour palette of bright colours this would not have reflected the emotions that my character was feeling and would be confusing for the viewer. The darkness of his clothing also presented the aesthetic look I was after.
For the colour palette of my main character I wanted colours that would reflect his emotional state and mood. The black of the hoodie matched his emotions concerning school and his life; his mood was dark and so were the colour of his clothes. I also felt that the pop of red on the hoodie reflected the anger and frustration my character was feeling at the time. If I had used a colour palette of bright colours this would not have reflected the emotions that my character was feeling and would be confusing for the viewer. The darkness of his clothing also presented the aesthetic look I was after.
Mood board
First moodboard
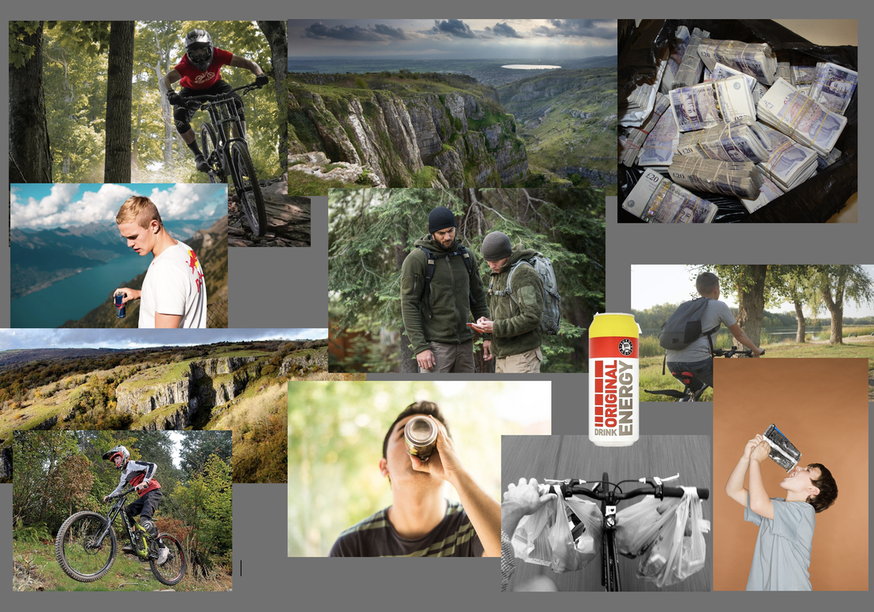
This is my first draft of my moodboard. Originally,I was going to incorporate a mountain bike chase scene in my film therefore, this moodboard includes some examples of mountain bike scenes. Due to the technical issues of filming a fast pace mountain bike scene, using the one-shot technique, I decided against including this scene. I wanted to stick to my original concept of producing a true one-shot film. This would not have been possible with the mountain bike scene, as I would have had to use obvious cuts that would stand out and would take away from the essence of the one-shot technique.
Finalised moodboard
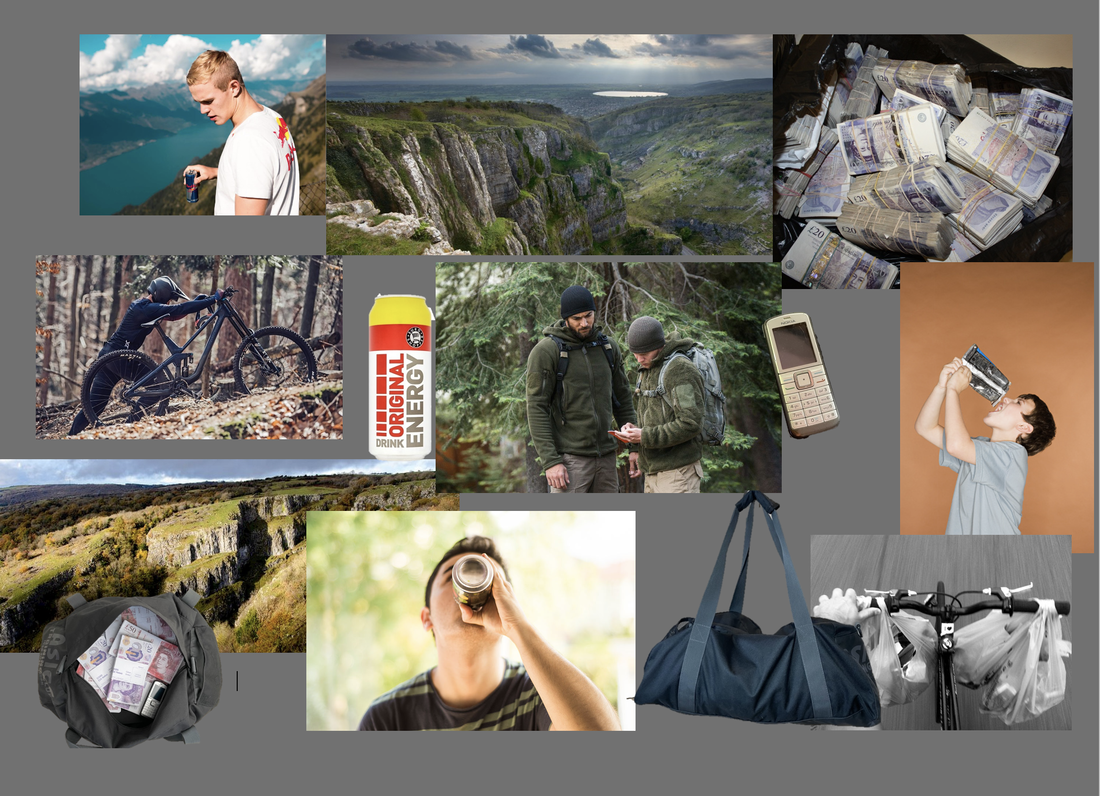
This my final moodboard. It is closer to the look and feel that I want to create in my film. I have included more touches that are closer to the real film e.g., images of the bag containing money, a County Lines mobile phone and an image of a person pushing a mountain bike.

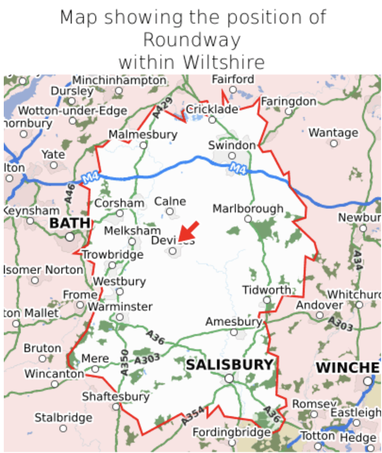
Roundway, Devizes
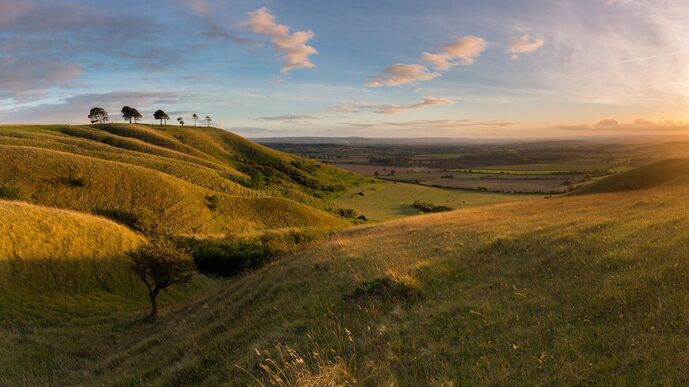
I really favoured this location as it was fairly near to me, and it provided the wide open space and 'wow' view I required for my opening scene. However, the location was two hours away from my main actor and this was going to cause problems logistically; taking a lot of time away from filming due to travelling time to the location. I decided reluctantly that this location wouldn't really be viable.
Bradford on Avon, Wiltshire

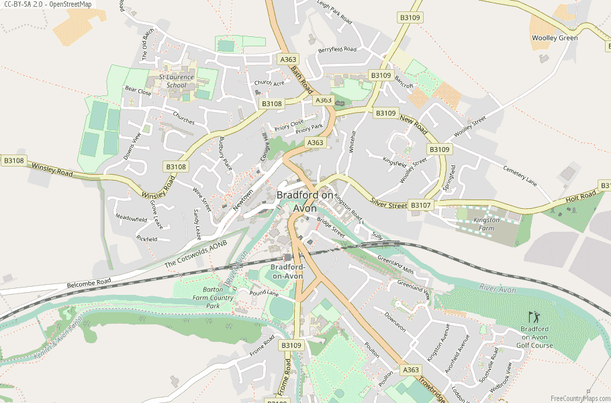
This was the nearest and most convenient location for filming. I have filmed in Bradford-on-Avon before and I love it's aesthetic appeal however, although the view over the townscape was eye-catching the location for filming a one-shot held many problems. It is a busy, residential, tourist and commercial centre which is problematic when you are shooting a one-shot; there would be too many potential interruptions to filming and this would prove hazardous in many ways for a one-shot. Also, I ideally wanted a location that established a feeling of isolation in my viewer and one that had more of a rural look and feel.
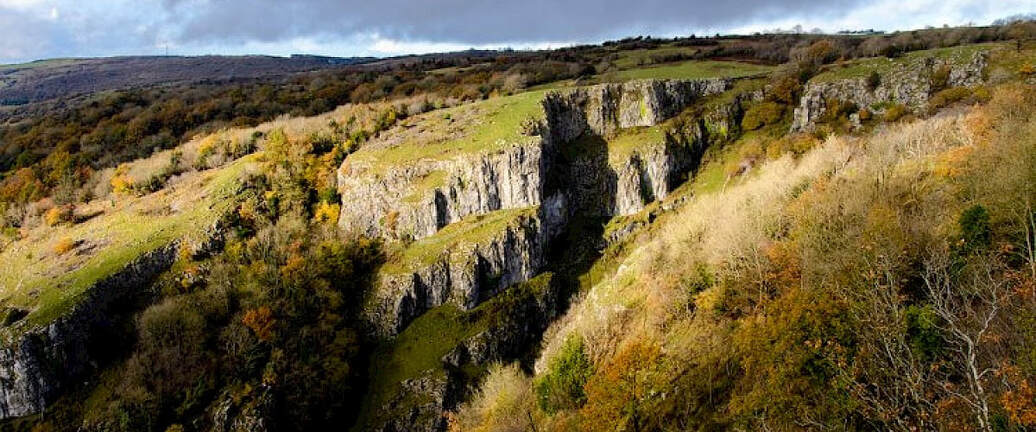
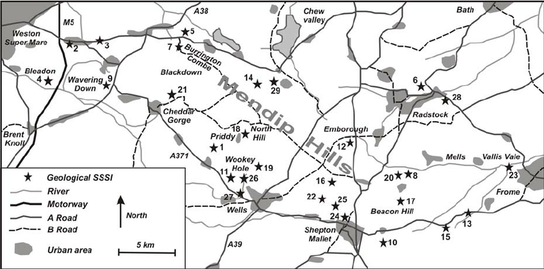
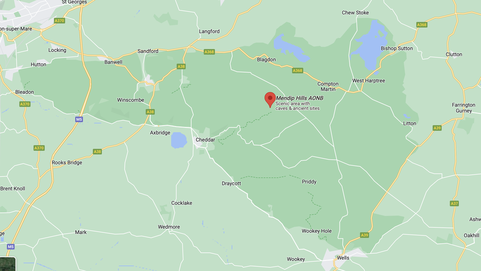
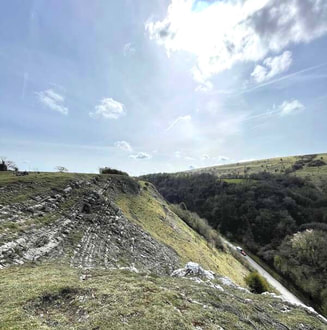
The Mendip Hills, Somerset
|
|
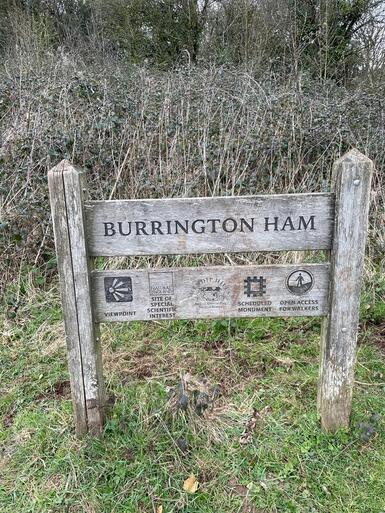
Burrington Ham, located in the Mendip Hills, is another location choice. My main actor lives close to Burrington Ham and it is fairly close to me. One advantage of this location is that my actors are very familiar with it and have suggested the ideal places to film a one-shot. It is also quiet and will provide the sense of isolation that I require. I also feel that the wide open landscape will be ideal for my opening shot. One drawback is that the terrain is rather rugged and uneven in places and might prove difficult when filming.
Reflecting on my research of the three potential locations I have concluded that Burrington Ham in the Mendips, is the location that provides the best filming potential. Although, the terrain is challenging in places I hope to resolve this by putting in some safety measures and carefully planning out my route for filming.
Reflecting on my research of the three potential locations I have concluded that Burrington Ham in the Mendips, is the location that provides the best filming potential. Although, the terrain is challenging in places I hope to resolve this by putting in some safety measures and carefully planning out my route for filming.
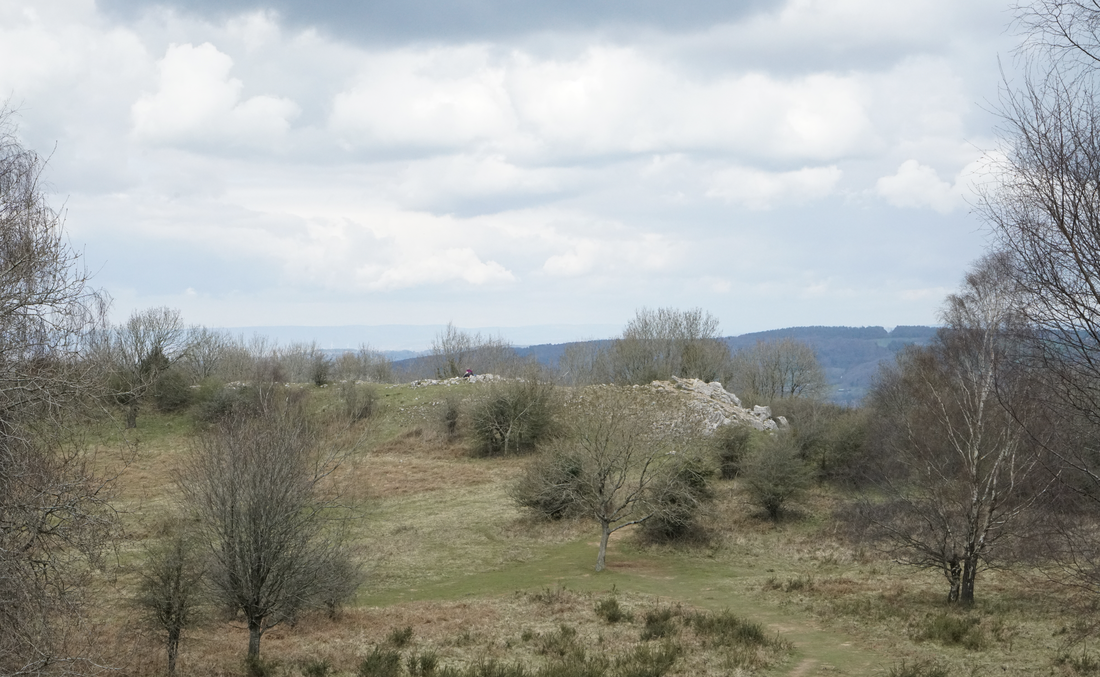
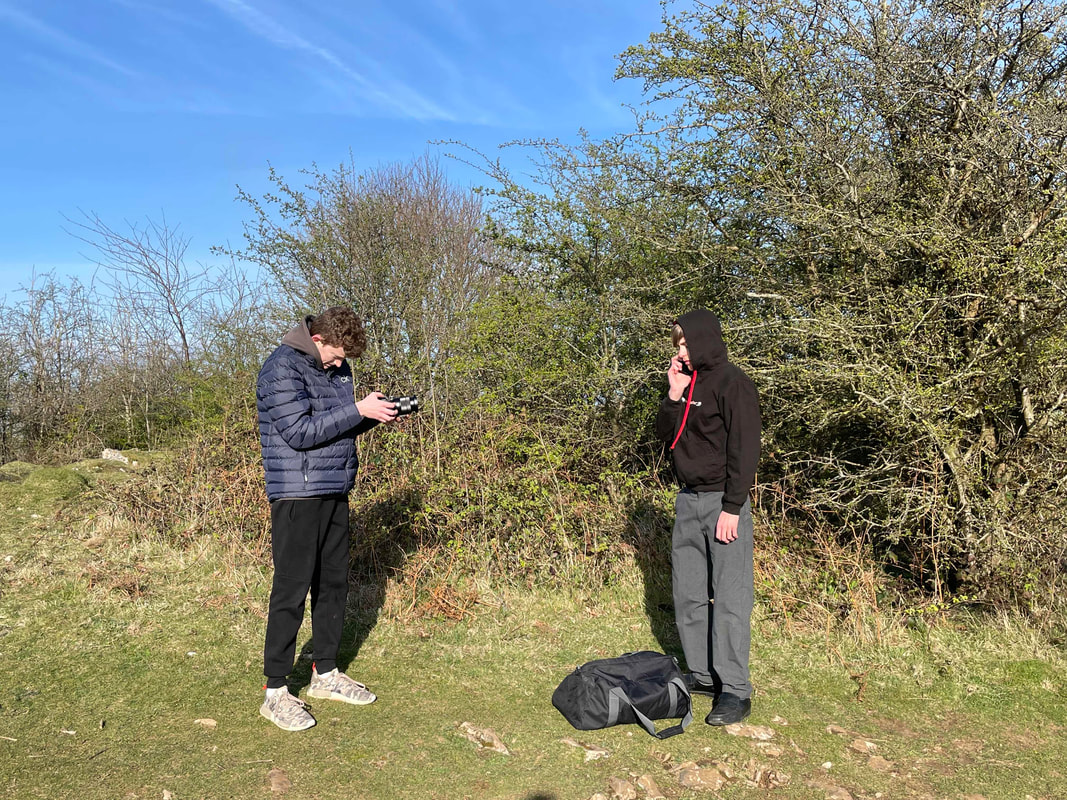
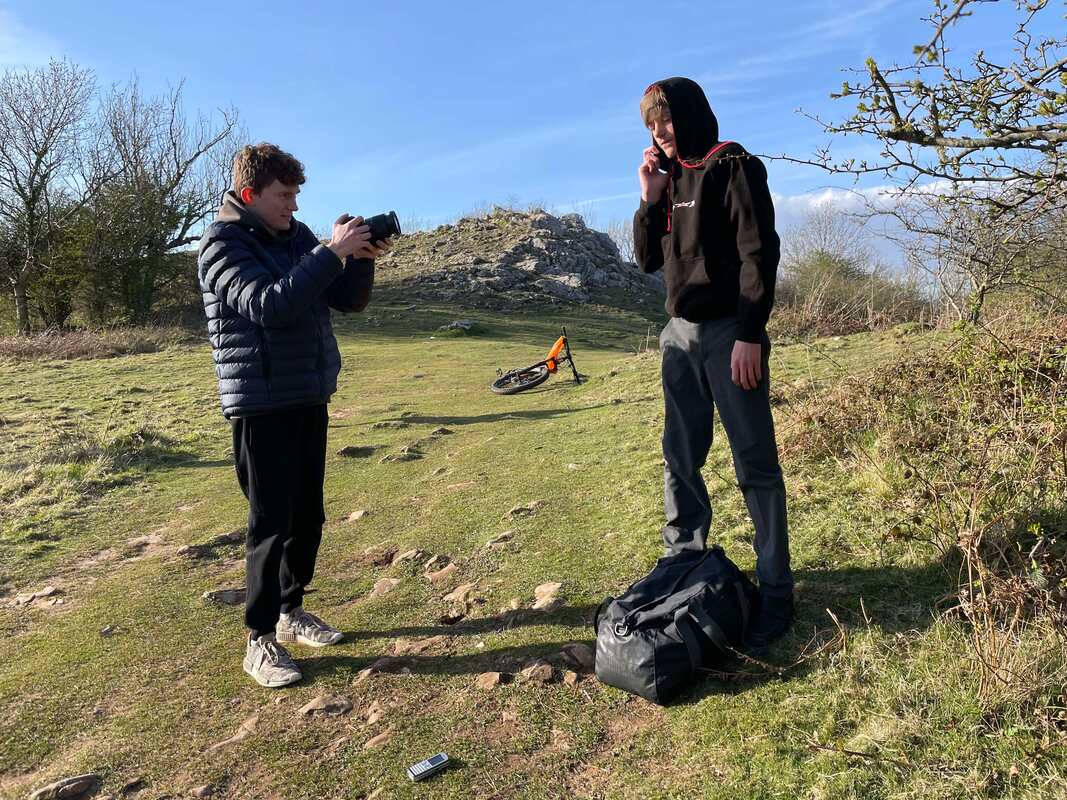
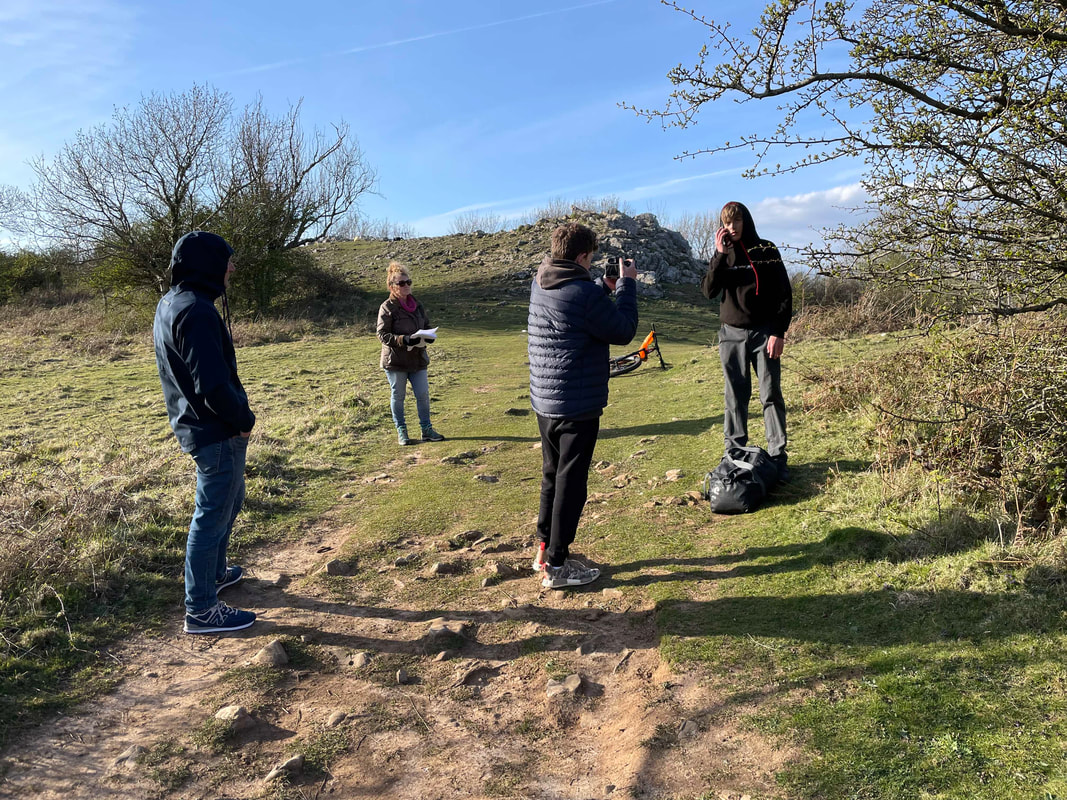
On location at Burrington Ham
I felt it was important to scope out a recce of my ideal location so that I could confirm to myself if I still felt it was suitable, and to highlight any issues that might evolve. I also wanted to flag up any health and safety issues that the location may present. This was a valuable exercise.
I immediately became aware that part of the location created more of a health and safety issue than I had first thought, due to the rocky terrain and sloping site. I came up with a way to hopefully prevent tripping while filming, by utilising a spotter particularly in this area. I also plan to try and follow a planned route for filming that is the least hazardous for both actor and camera operator, whilst still providing the aesthetic look and feel that I desire.
I immediately became aware that part of the location created more of a health and safety issue than I had first thought, due to the rocky terrain and sloping site. I came up with a way to hopefully prevent tripping while filming, by utilising a spotter particularly in this area. I also plan to try and follow a planned route for filming that is the least hazardous for both actor and camera operator, whilst still providing the aesthetic look and feel that I desire.
Test shots
I was able to film some test shots which provided me with some valuable insights.
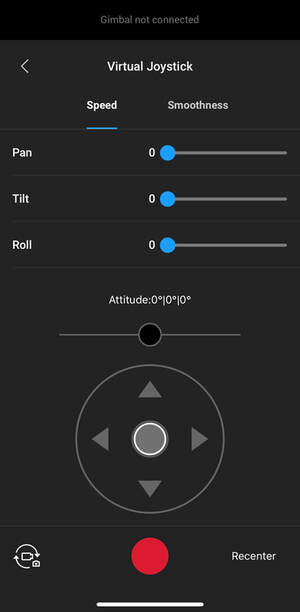
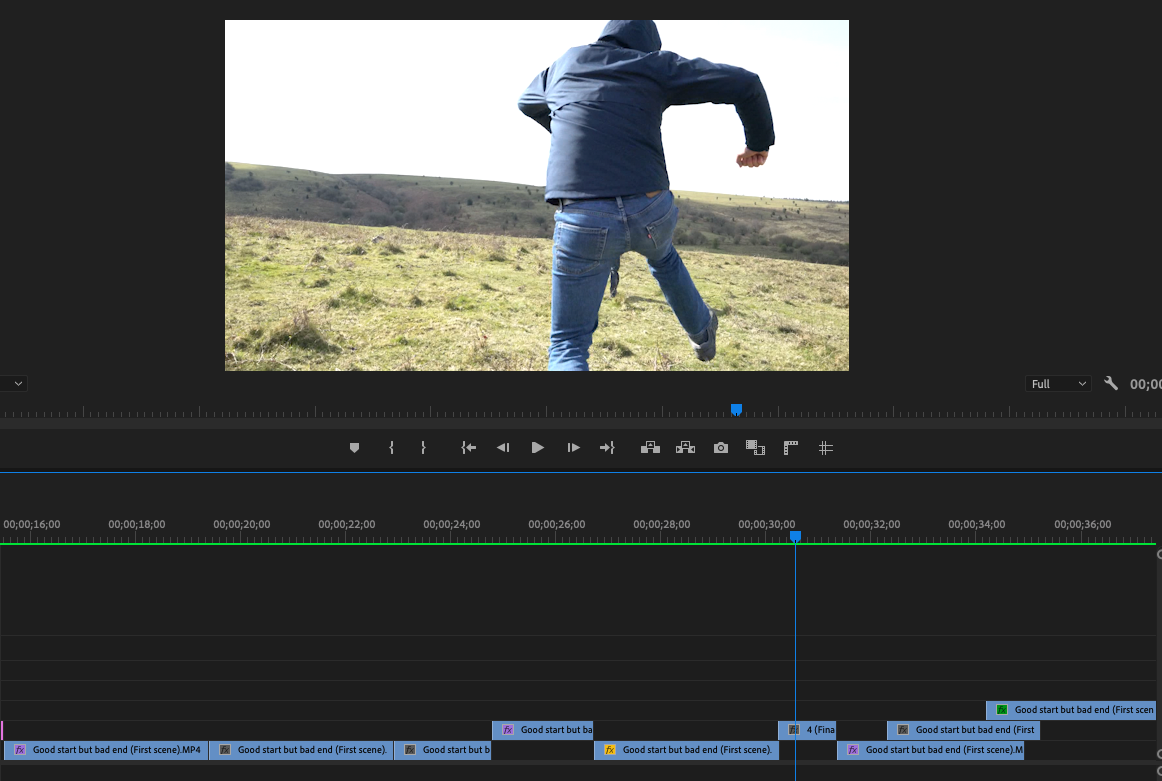
Whilst taking test shots, a critical issue became evident to me, which was the tracking of my character whilst moving down the hill. It was incredibly difficult to always keep my character in the centre of the frame. I had not realised that this would be an issue as I thought I would be able to control the camera head at the same time. This meant troubleshooting the problem. I became aware, through research, that I could overcome this issue by utilising the DJI App which has a virtual joystick, allowing you to control the camera head. I am hoping that this will resolve the problem.
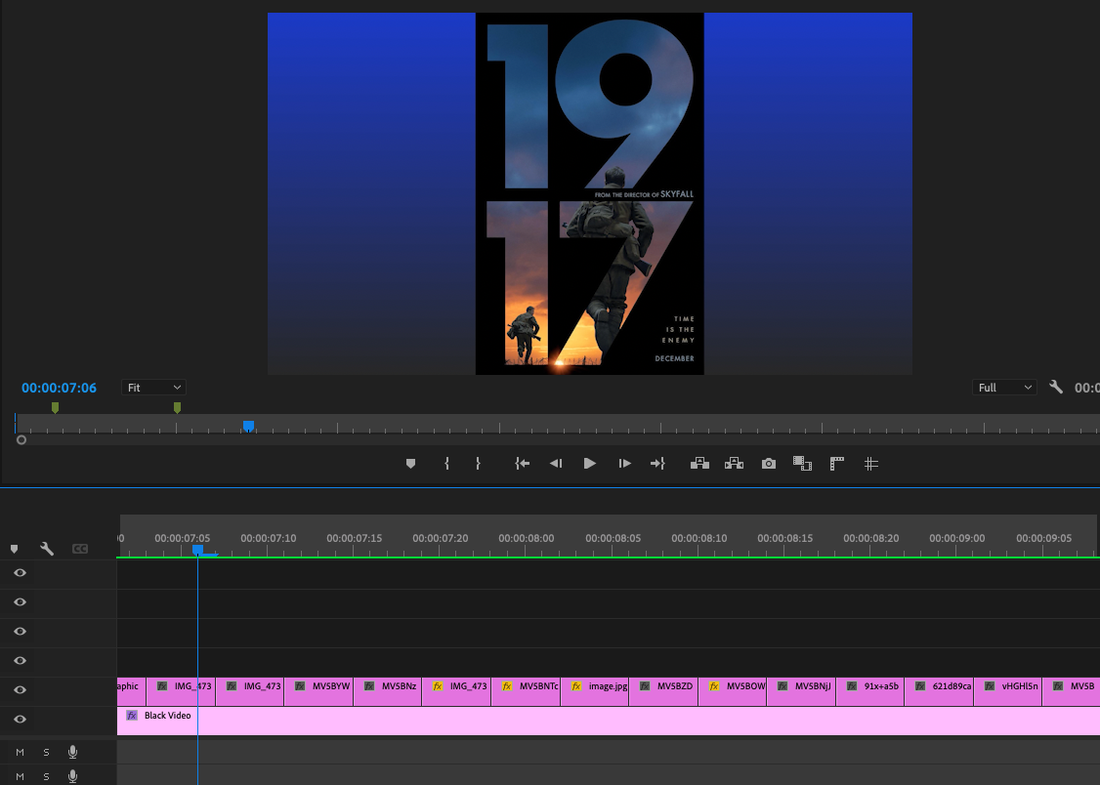
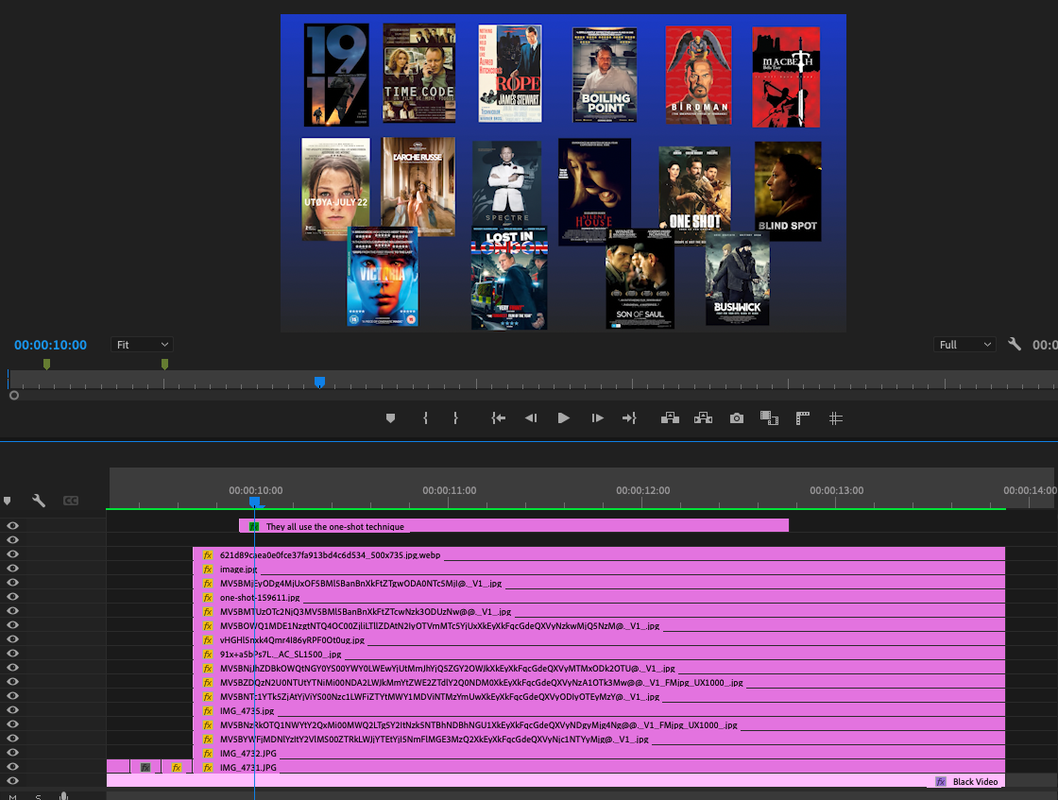
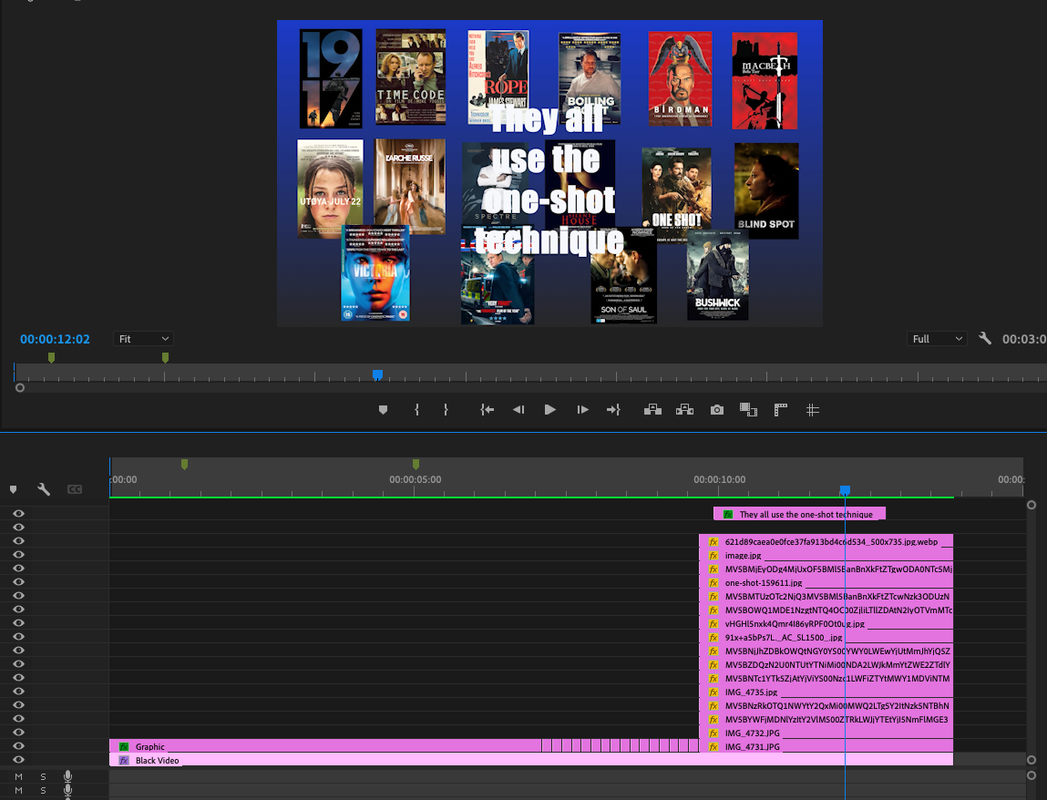
One purpose of taking test shots was to identify the best locations for making hidden cuts if needed. My initial plan is to try and film my project as a continual one-shot however, there does need to be a cut somewhere as it won't be possible to film it all in one-take. Given the openness of the location places for hidden cuts were limited but I searched for potential places where I could utilise a blocking shot. I identified a number of trees just off the path, medium height scrub areas and rocks which might be useful for a hidden cut. I also had in mind to potentially use my antagonist or main character passing in front of the camera as an opportunity to make a hidden cut. My research showed that all of these types of solutions have been used in one-shot films such as '1917'.
Whilst taking test shots, a critical issue became evident to me, which was the tracking of my character whilst moving down the hill. It was incredibly difficult to always keep my character in the centre of the frame. I had not realised that this would be an issue as I thought I would be able to control the camera head at the same time. This meant troubleshooting the problem. I became aware, through research, that I could overcome this issue by utilising the DJI App which has a virtual joystick, allowing you to control the camera head. I am hoping that this will resolve the problem.
One purpose of taking test shots was to identify the best locations for making hidden cuts if needed. My initial plan is to try and film my project as a continual one-shot however, there does need to be a cut somewhere as it won't be possible to film it all in one-take. Given the openness of the location places for hidden cuts were limited but I searched for potential places where I could utilise a blocking shot. I identified a number of trees just off the path, medium height scrub areas and rocks which might be useful for a hidden cut. I also had in mind to potentially use my antagonist or main character passing in front of the camera as an opportunity to make a hidden cut. My research showed that all of these types of solutions have been used in one-shot films such as '1917'.
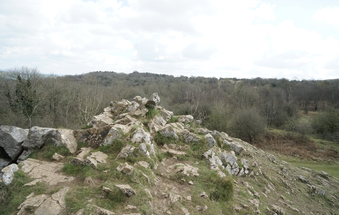
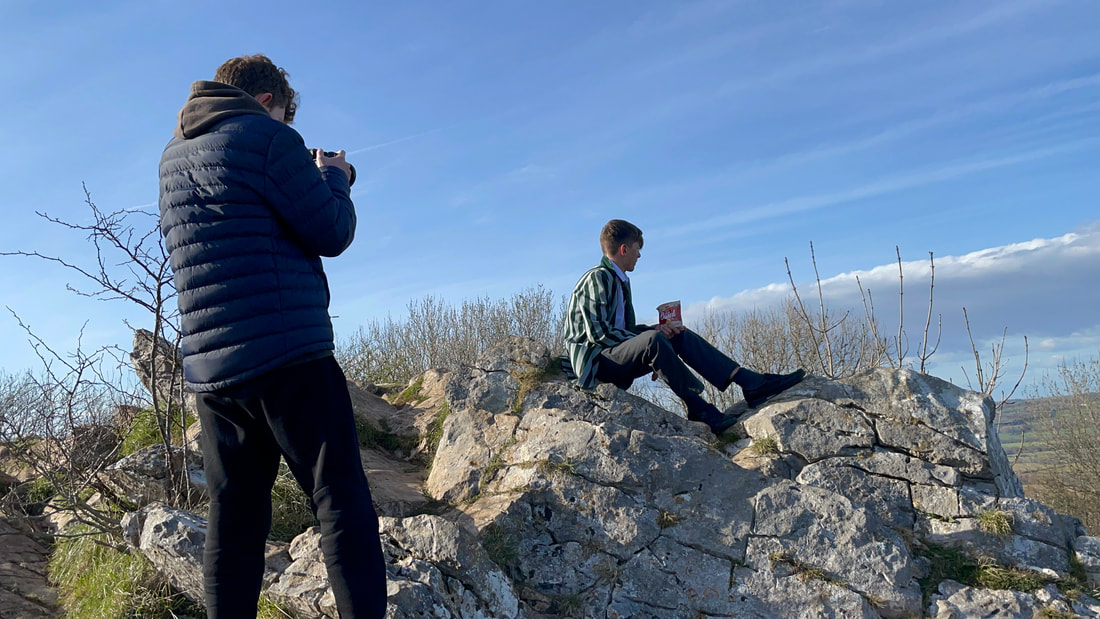
Photos of the setting -
I aim to base my opening shot and scene from this rocky outcrop, following a carefully planned out and rehearsed route.
I aim to base my opening shot and scene from this rocky outcrop, following a carefully planned out and rehearsed route.
|

|
|
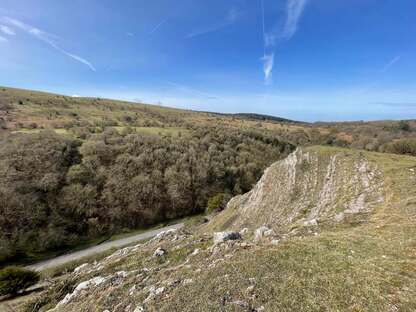
End Scene Location
|
|
This is the end scene location I have chosen as I feel it is extremely dramatic and has the 'Wow' factor I was looking for. I think it will bring the element of growing suspense as my main character is chased along the side of the cliff to dramatically halt at the edge, with nowhere else to go.
Character tracking
|
|

|
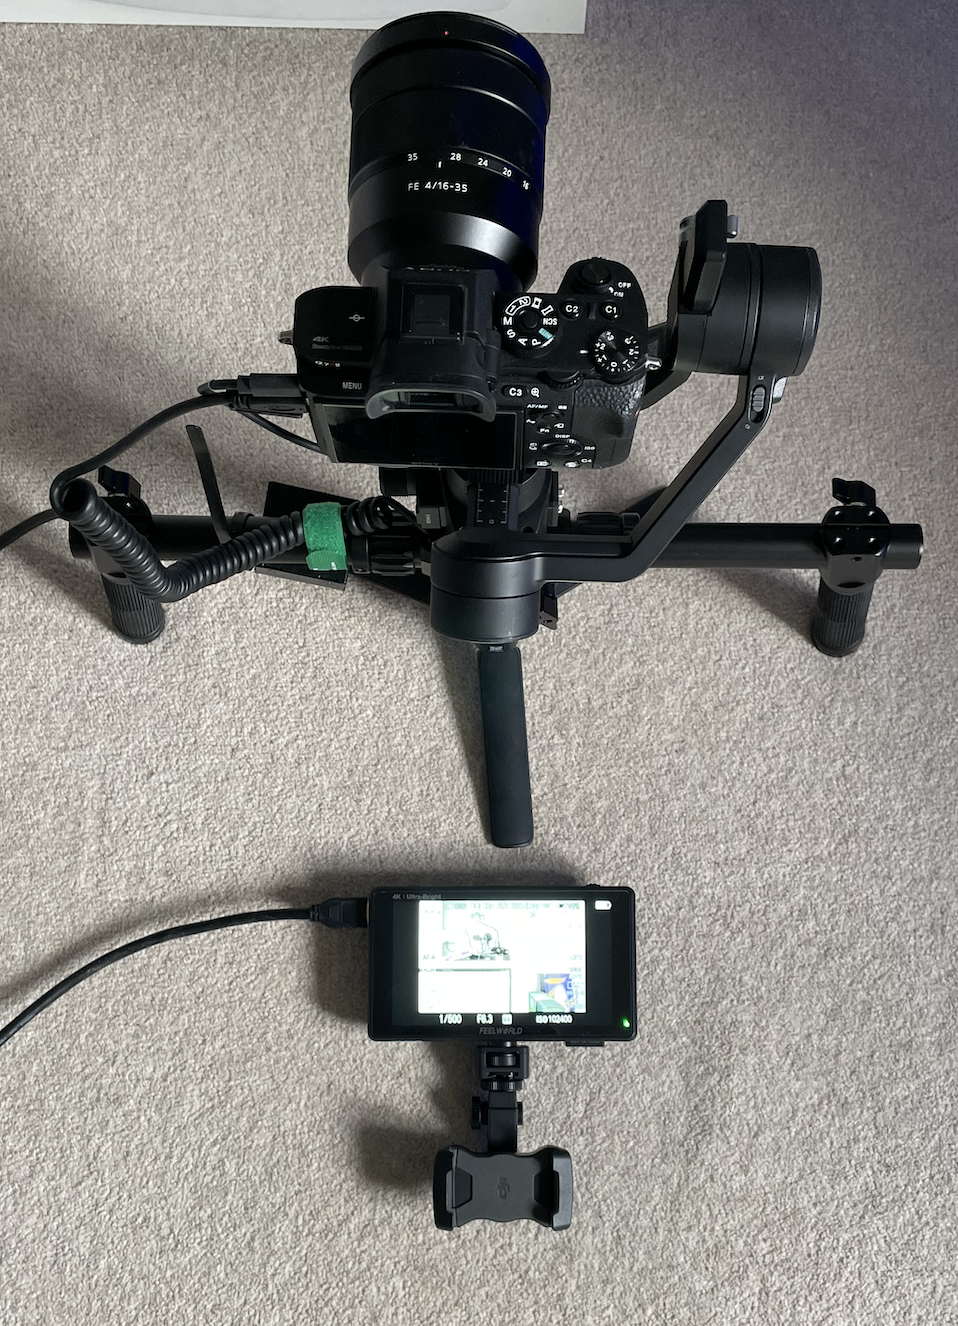
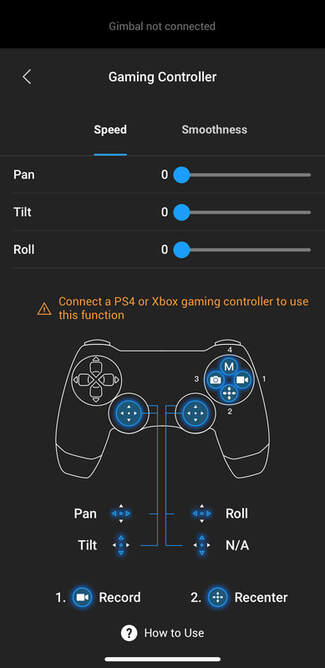
This is how I have troubleshooted a solution for keeping control of the camera head, whilst filming going down hill. In an ideal world I would have a wireless transmitter, transmitting the image from my camera, to a monitor, that an individual would be able to view and control the camera head from a far. However, I don't have access to this equipment so, I have come up with a solution after brainstorming ideas. Firstly, I thought I could utilise a tethered connection; putting an HDMI splitter on my existing output cable from my camera and then a long HDMI cable which is then connected to my monitor. However, although this did work there was a connection issue with the splitter. Instead, I have purchased an extra long micro HDMI (Type D) to HDMI (Type A) cable. This will isolate the point of failure which is causing issues. This does create one limitation, in that my operator of the camera head has to follow fairly closely to the camera. This means there needs to be an additional person spotting for them in order that they are kept safe.
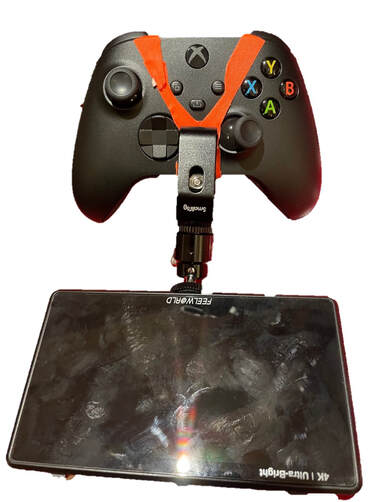
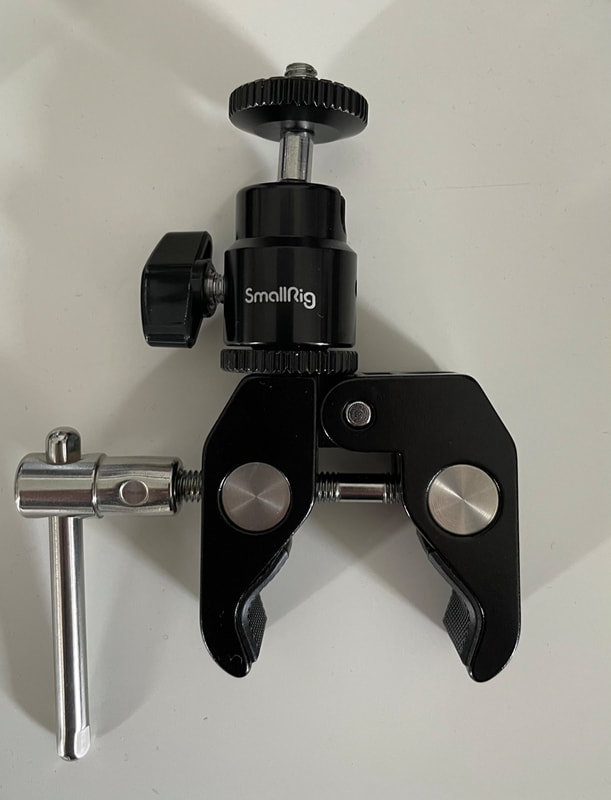
I have improved my original idea of controlling the camera as, when researching I was made aware of the use of utilising a Bluetooth Gaming controller. However, at first I didn't implement this as I didn't have access to this specific controller but, I was then able to source one at the last minute. I then had the issue of connecting my monitor to the controller so, I utilised a C clamp to clamp the monitor to the controller. This seemed to do the job. Throughout the process of organising and planning the filming I have been made increasingly aware that you continually need to think on your feet, and think out outside the box to problem solve the multiple issues that occur, especially for a one-shot film.
|
|
|
There was an issue that evolved when clamping the monitor to the controller that the surface of the controller was a slippery plastic, which had no grip. I resolved this issue by putting textured tape on the controller to create a grippier surface for the clamp.
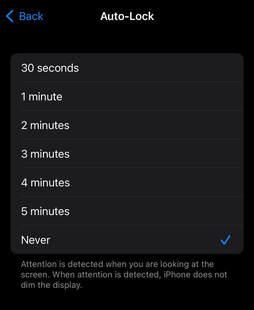
When connecting the controller, the DJI App is used to connect the controller to the gimbal. The only slight flaw in using the App was that I found if my phone screen turned off I lost full control of the camera head. I resolved this by setting my screen to be on continuously and therefore I no longer had to deal with this problem.
When connecting the controller, the DJI App is used to connect the controller to the gimbal. The only slight flaw in using the App was that I found if my phone screen turned off I lost full control of the camera head. I resolved this by setting my screen to be on continuously and therefore I no longer had to deal with this problem.
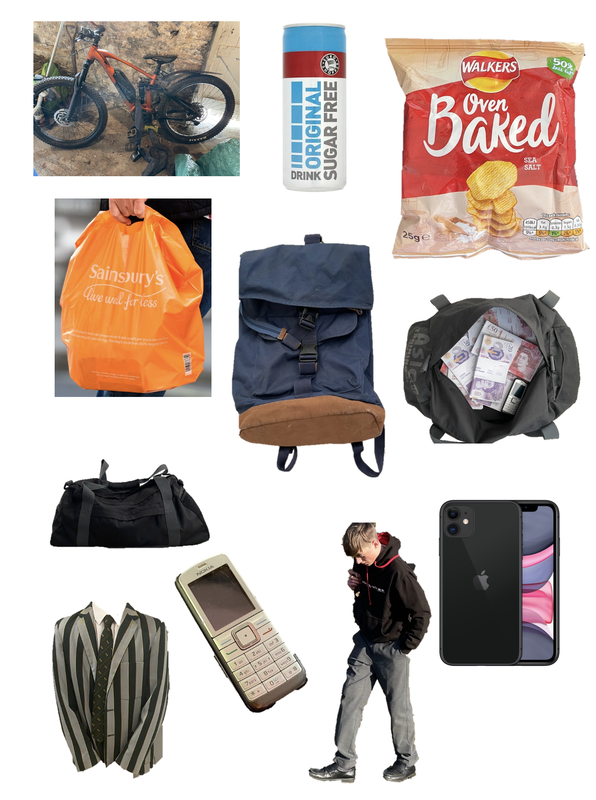
Props List
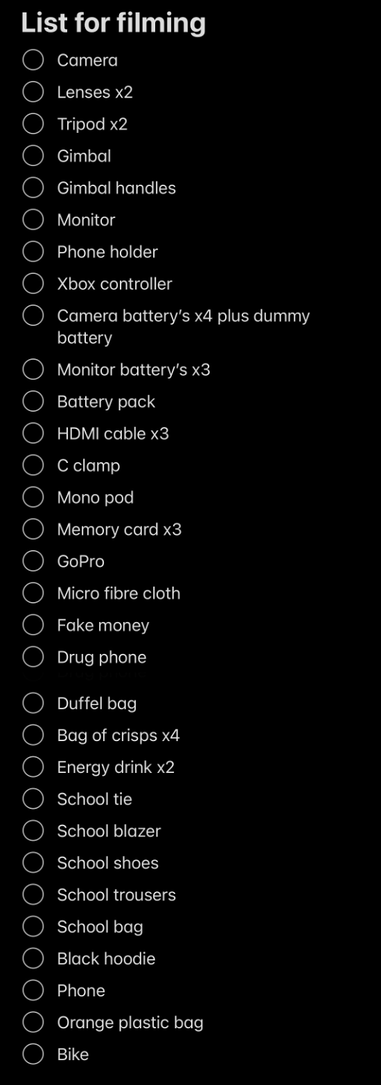
This is my original prop list.
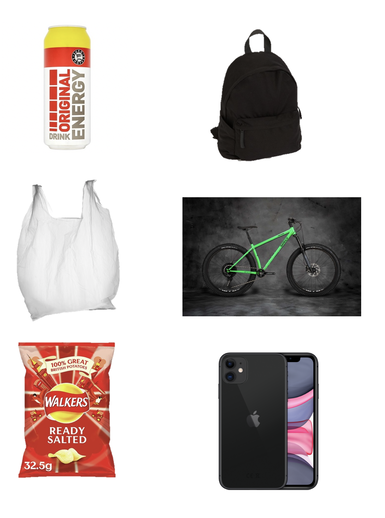
Finalised prop list
|
This is a visual list of the props I used in my film.
The electric mountain bike is used by my main character Theo. He pushes it along the path before he discovers the bag full of money. I used it to enhance visual interest and to highlight that Theo comes from a well off background. The energy drink- Theo is seen drinking and throwing the can carelessly away which aids in building up a picture of Theo's character and attitude. Crisp packet- Theo is seen tipping the bag up to get the last crumbs and then throwing it away and it then gets caught by the wind. Sainsbury's bag- This is carried by Theo down the hill and he is seen swinging it as he walks. This was to add interest and to aid building a visual picture of how Theo felt fed up. Blue backpack- This contains Theo's change of clothes and it is where he shoves his school clothes. He also aggressively flings it down the hill. I wanted to use it to emphasise his anger and frustration with his life and to further immerse the viewer with Theo's character. Duffle bag- This is where the stash of money and the County Lines phone is discovered by Theo. I chose a bag that was large enough to hold a considerable amount of money. I also wanted a bag with handles that could be easily picked up by my Theo when he pulled it out of the undergrowth. School blazer- I chose this blazer and tie as it clearly indicates that Theo is of school age and that he attends a private school. This builds up a picture of Theo for the viewer. IPhone- This is the iPhone that Theo uses. It adds to the building up of the picture of Theo being from a well off background. I included the use of the phone as a technique to interject action and information on my character. |

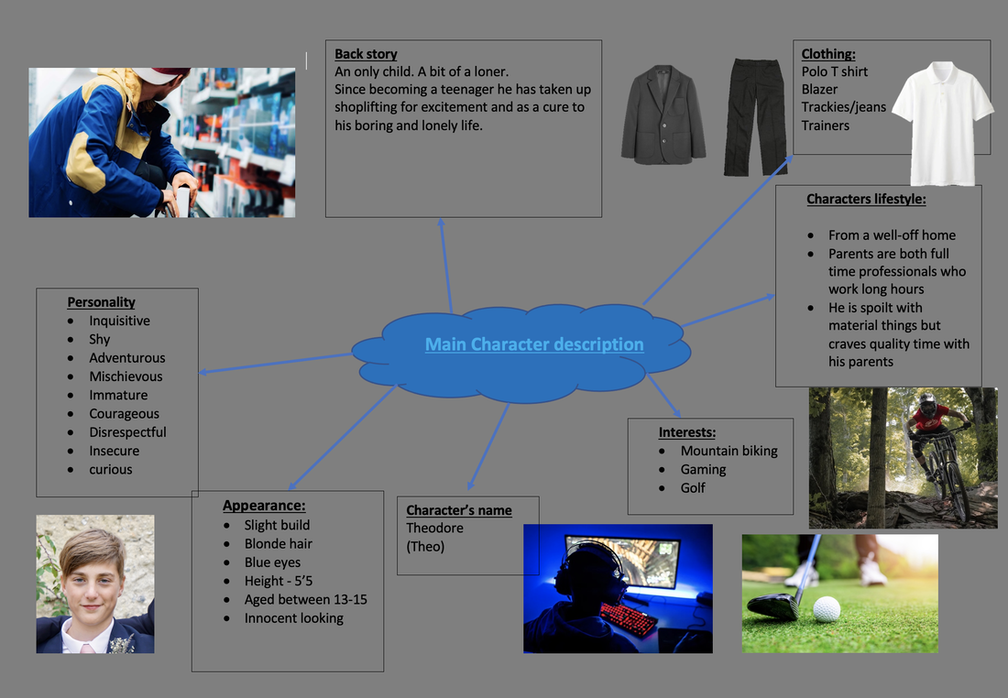
Originally, I was going to portray my main character as being 'chavy' ; a young British male who partakes in anti-social behaviour and dresses in tracksuits and may wear flashy jewellery. However, it would be too stereotypical for this individual to steal the money and this wouldn't necessarily showcase the moral dilema that is key in engaging my audience. After discussing this with my actors, I developed the idea of portraying my character as a 'posh-boy'. Someone who comes from a well off background wouldn't necessarily need the money and my audience might expect that he would report the bag of money to the police. I want to challenge my audience over stereotyping people.
Following on from this, the actor I have chosen for my main character, has a very innocent, naive look about him. This is in complete contrast to his actions and personality which is slowly revealed as the storyline develops. I aim to continually reveal a different side to his personality, which will hopefully engage the viewer in the character's journey and keep them guessing as to how he will reacte to events along the way.
Following on from this, the actor I have chosen for my main character, has a very innocent, naive look about him. This is in complete contrast to his actions and personality which is slowly revealed as the storyline develops. I aim to continually reveal a different side to his personality, which will hopefully engage the viewer in the character's journey and keep them guessing as to how he will reacte to events along the way.
|
|
Slight alterations to my character description
|
|
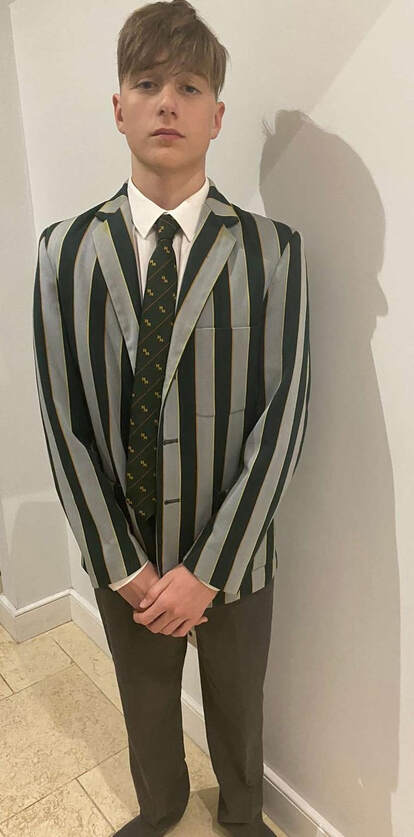
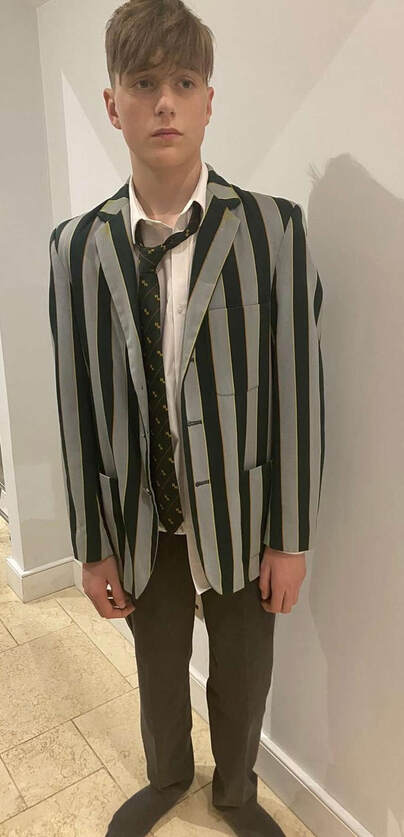
This is the clothing that my main character will be wearing. A school uniform comprising of a school blazer, tie, white shirt, school trousers and black shoes. I took two photos of my main character as I needed to decide how I wanted to portray him; neat or scruffy. I decided on the second photo as I felt it was a good representation of how my main character was feeling and how he was disengaged with school.
Unknown figure
|
Unknown character
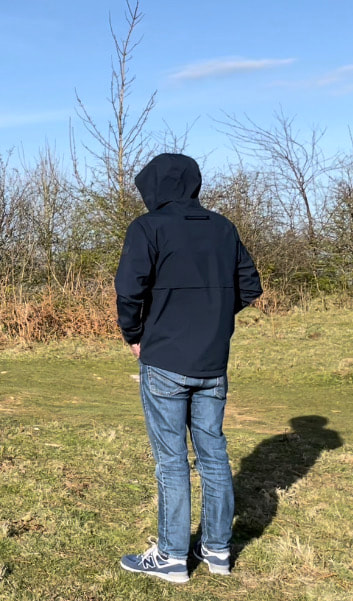
I dressed my unknown character in casual clothing, that might be worn for going on a walk in the countryside. The reasoning behind this was that I wanted to portray my unknown character as a normal looking individual who looked perfectly natural in the landscape he was in. I didn’t want him to stand out or look out of place in his surroundings, as I wanted the character’s actions to build a picture in the viewer’s minds of what the character was like. By doing this, I would hopefully surprise and therefore engage the viewer with the unknown character. As he suddenly reveals his true criminal identity, through his actions directed against the main character, the viewer will be forced to quickly change their perception of him and engage more deeply with the narrative. |
Talent Release Form
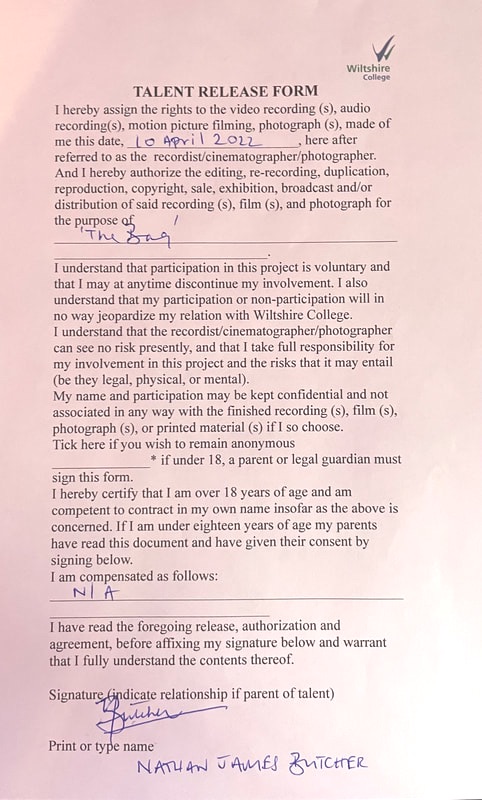
|

|
Risk Assessment
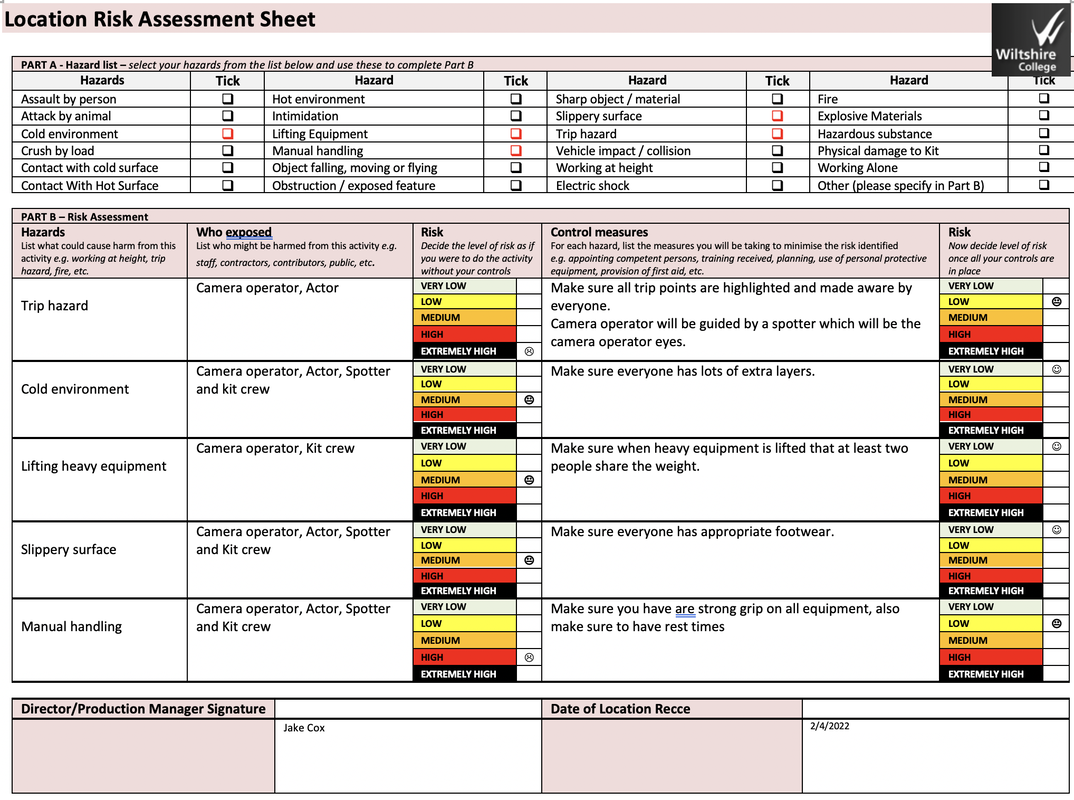
|
|
I was very aware that I had to get this risk assessment correct and include every single small risk that I could think of due to the risks involved in the location. Uneven ground, sheer cliff faces and slippery surfaces were just a few of the high risk features that I had to make sure were covered safely. As I had a number of crew that all worked closely together, I also had to make sure that they had read the risk assessment and were aware of the risks identified. I made sure I had fully briefed them before filming and throughout the process.

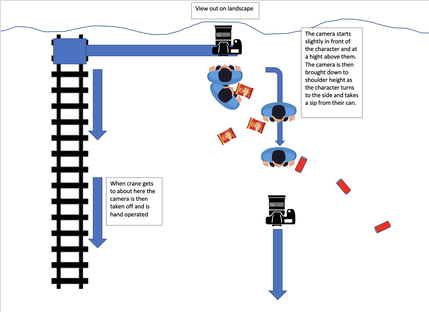
This was how I planned to utilise the crane in part of the film however, I had to abandon the use of it, as explained in my context and research.
I made a detailed list of every item I needed to remember to take on location. I have learnt from previous projects how essential it is to organise props and kit etc before shooting. It wastes valuable time if you forget items and have to retrieve them during filming. As I was filming quite some distance from where I live, forgetting something would have caused a number of problems and impacted time schedules. As I was undertaking a one-shot the impact of forgetting any item would be more exaggerated because we would have to start the filming process right from the beginning.
I double checked my items against the list several times the night before filming and also asked a member of the crew to check through as well. I was then confident that I was ready for the next days filming.
I double checked my items against the list several times the night before filming and also asked a member of the crew to check through as well. I was then confident that I was ready for the next days filming.
'The Bag' Script
|
|
|
|
On the lead up to filming I checked through all the fine details of planning, which included the availability of actors on the days planned. Unfortunately, at the very last minute one of my antagonist actors was unable to commit to the times and days agreed. This was a major blow however, I managed to alter my script and to brief the remaining actors. This was done by removing one of the antagonist actors and rewriting the script slightly so that there was only one antagonist involved. I was disappointed in not having two gang members as this would have added extra action and more character interaction however, it was too late to source another actor. I was satisfied that I had done all I could to rectify the problem.
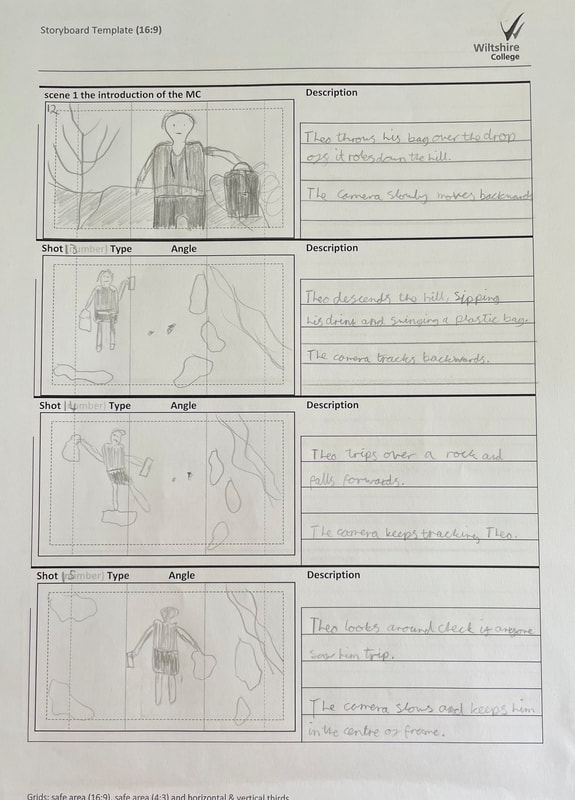
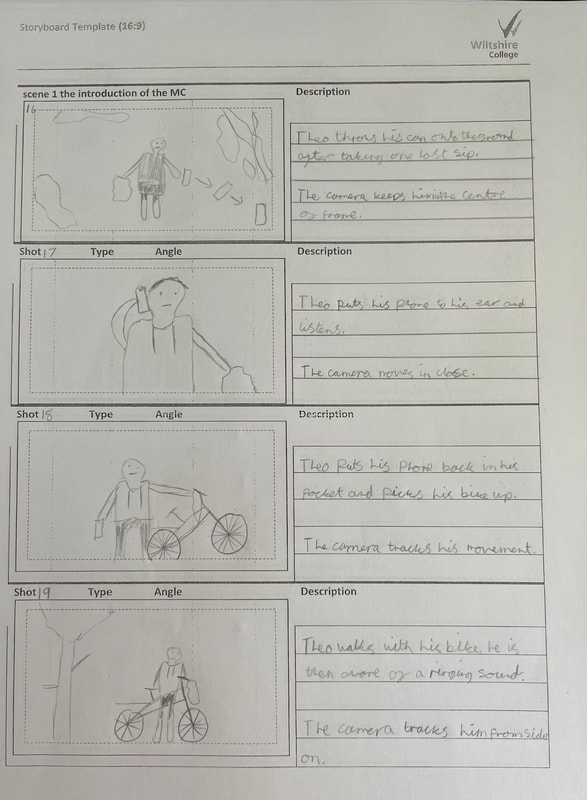
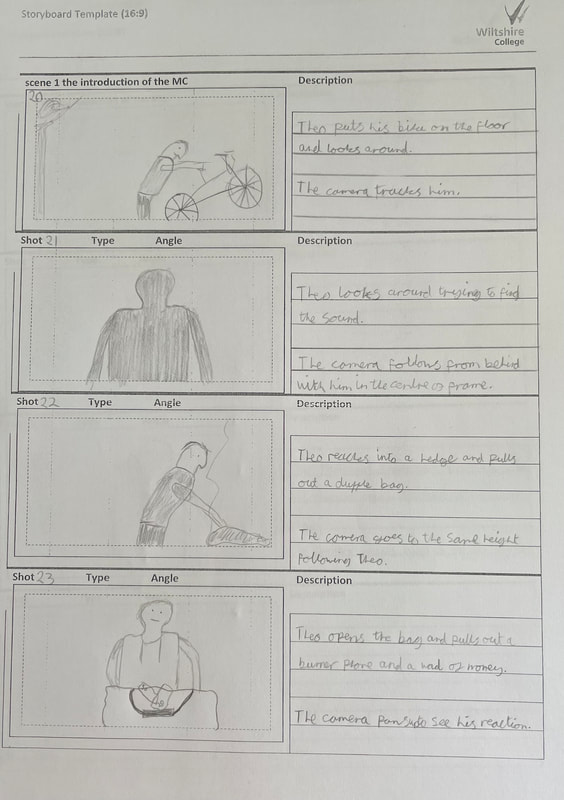
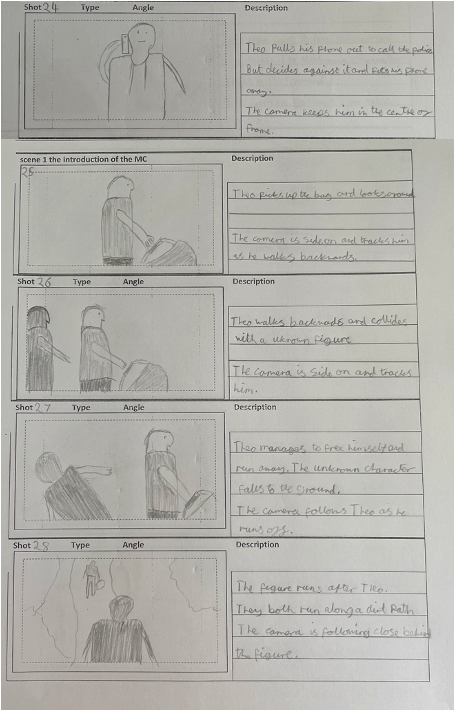
Storyboard
|
|
|
|
|
|
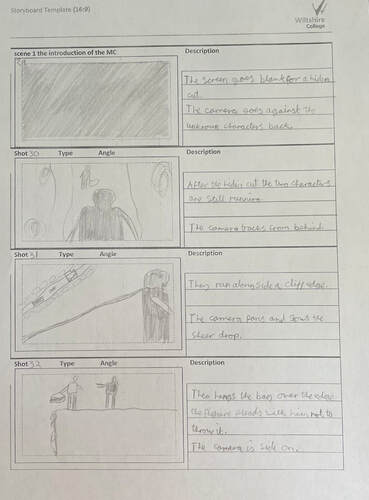
This is the final storyboard. I had to make several changes to my story as I only had one antagonist character right at the last minute. I changed my storyboard to accommodate this.
I tried to include as much detail as possible in my storyboard as I felt it would be beneficial, as my film was a one-shot. I hoped it would give my actors a fuller understanding of each scene. My research showed me the importance of the actors having a as much information as possible about their role, the steps they are required to take and the scenes they are acting in. This is because they need to be completely immersed in their character and comfortable with every aspect of the production, so that a smooth one-shot film can be produced. Providing my actors and the rest of the crew with a comprehensive storyboard would hopefully fulfil this aim.
I tried to include as much detail as possible in my storyboard as I felt it would be beneficial, as my film was a one-shot. I hoped it would give my actors a fuller understanding of each scene. My research showed me the importance of the actors having a as much information as possible about their role, the steps they are required to take and the scenes they are acting in. This is because they need to be completely immersed in their character and comfortable with every aspect of the production, so that a smooth one-shot film can be produced. Providing my actors and the rest of the crew with a comprehensive storyboard would hopefully fulfil this aim.
Cast /Crew list
Actors
Main character - Theo (14) - NJB
Unknown Antagonist Figure - (50) - NB
Crew
Camera operator -JC/ MC
Grip - CC
Spotter - CC/NB
Runner - SC
Main character - Theo (14) - NJB
Unknown Antagonist Figure - (50) - NB
Crew
Camera operator -JC/ MC
Grip - CC
Spotter - CC/NB
Runner - SC
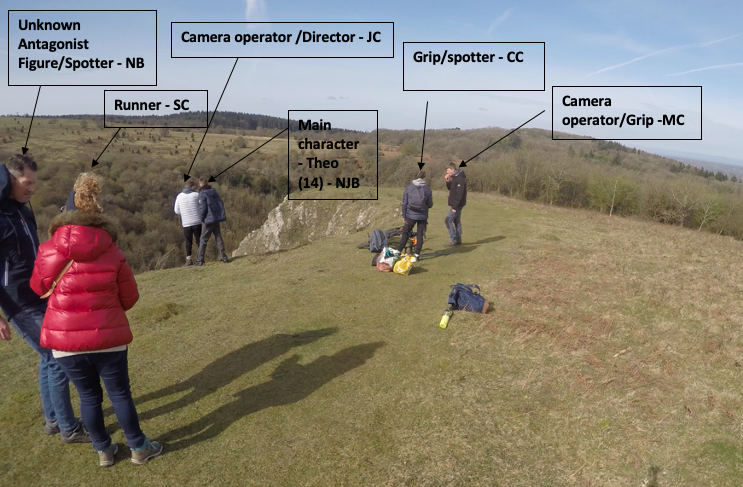
To film a one-shot I had to have a well organised and briefed crew who worked seamlessly well together. It was important right, from the beginning, that I talked to my crew about the importance of team work in this type of filming. If the crew did not work as a team it would go terribly wrong but also, because of the location, it could become dangerous. Communication within the crew was also key in order to pull off my one-shot without it taking a very long time.
Hidden cut
|

|
|
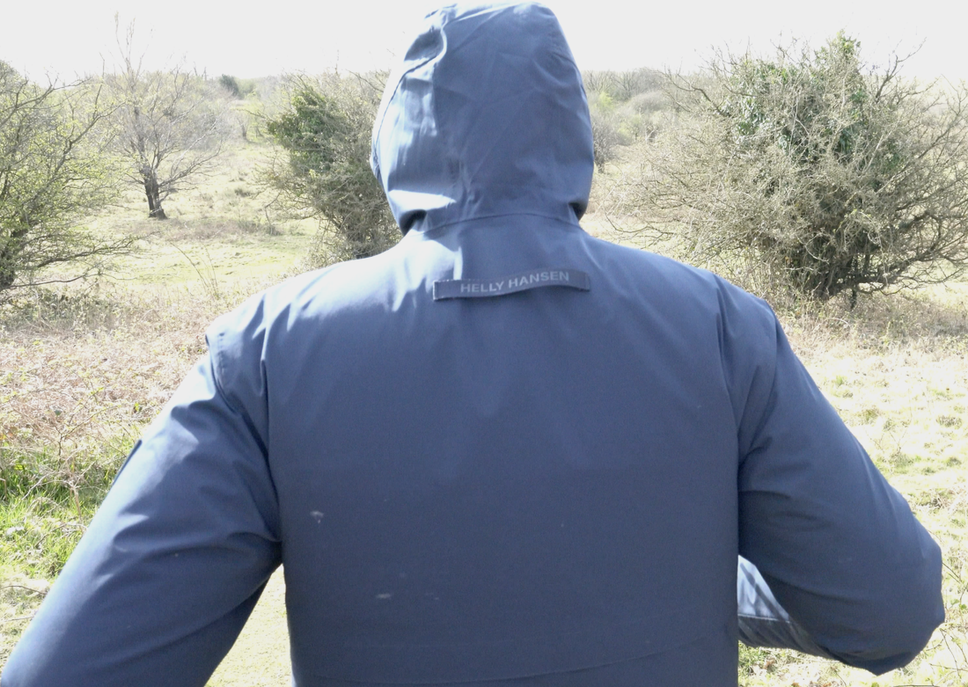
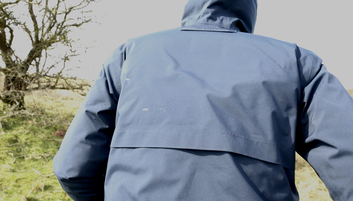
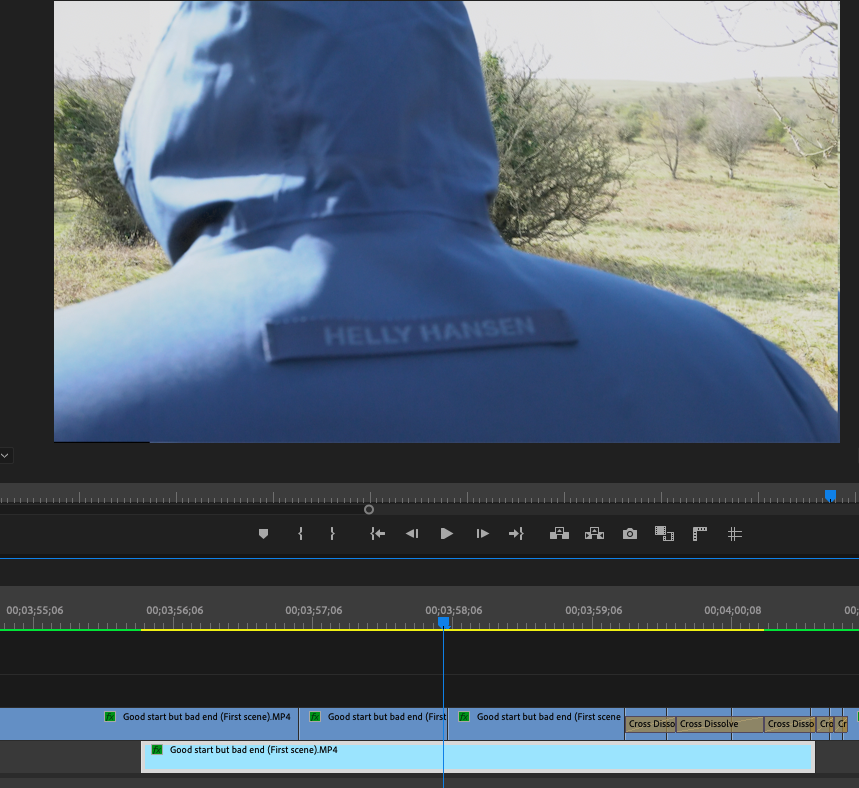
Having gained a thorough insight into the techniques for making hidden cuts, I decided that the best option for my film, especially as we needed to change location slightly for the final scene, was utilising my antagonist character's back to mask a hidden cut. It took a few attempts to perfect the angle and for the character to move correctly so that the shot worked. This was potentially tricky for the antagonist character as he couldn't see what the camera was doing behind him. However, after running through the motions and direction of movement with the character and crew we were able to achieve the desired effect. I learnt that it is crucial, when filming a one-shot, to have the actors and crew working in harmony, fully briefed and confident in their individual roles and the part they play, in order to bring everything together seamlessly. Everyone involved has to be a team player.
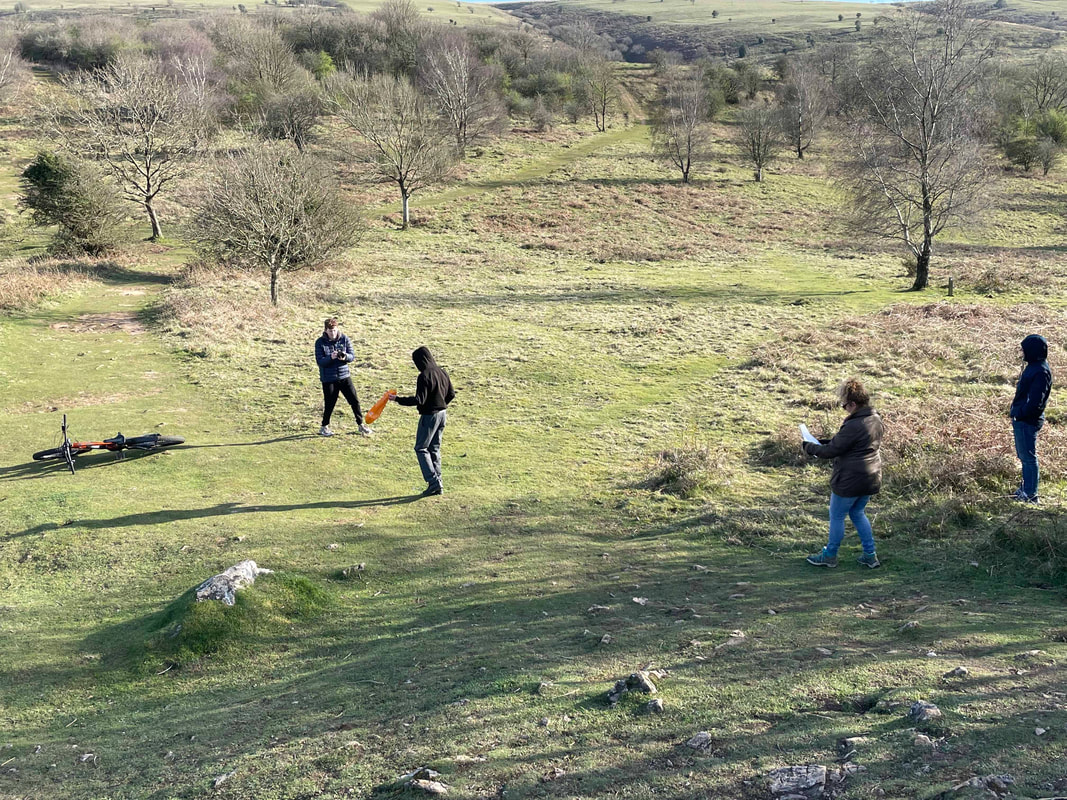
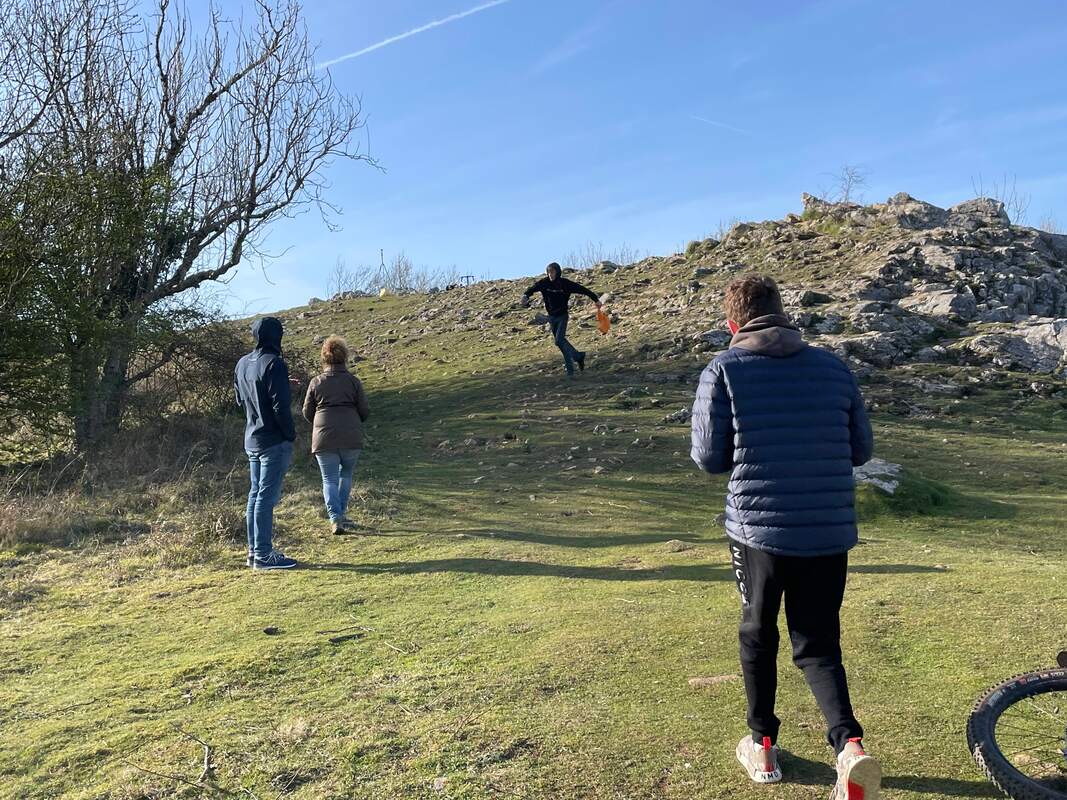
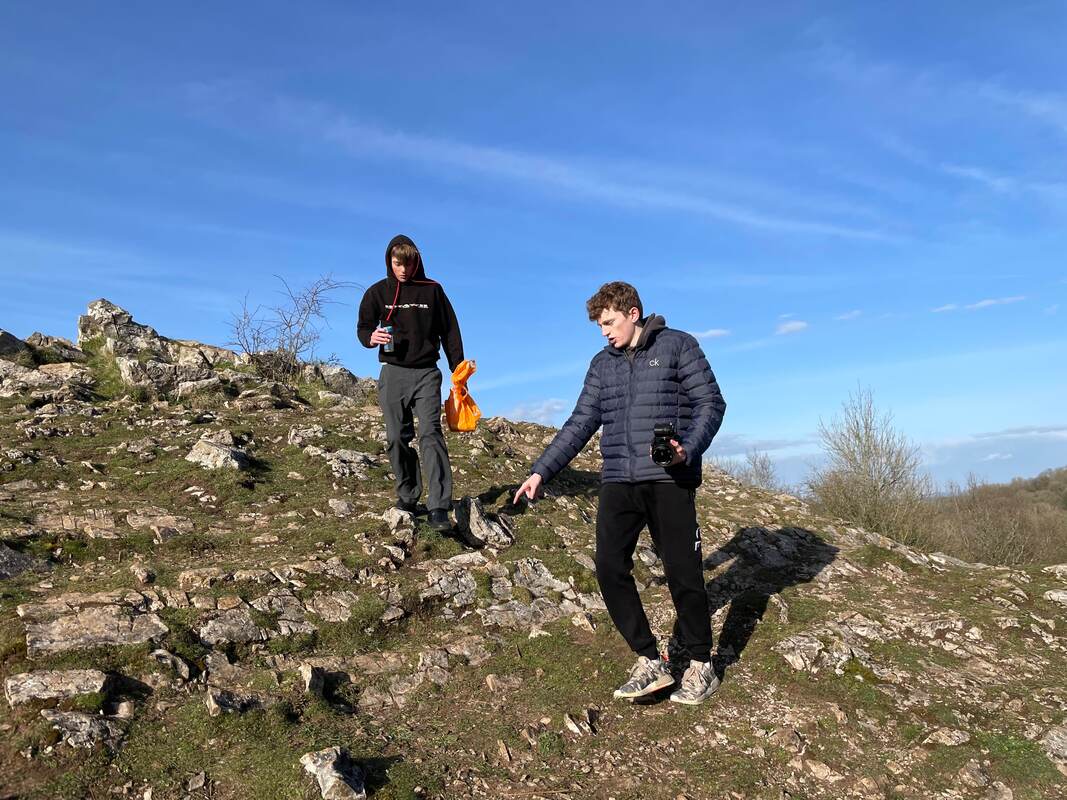
Run through of actions with actor
I knew it was essential that my characters and crew knew their roles and what was involved. Therefore, I dedicated as much time as possible to the run through. It turned out to be the whole of the first day but was time well spent.
Firstly, I briefed the main actor and walked through with him a number of times, the path he had to follow. This was especially important due to the health and safety issues surrounding the location. As this process was going on I felt it would be beneficial to film it as a record and a useful reminder, before we filmed it for real. This was useful because I had a lot of equipment which would take a while to set up and I wanted to fully focus on explaining the steps and highlighting the importance of safety.
Once I was satisfied that my main actor knew the steps he had to take and would be kept safe, I was much more at ease for the next days filming. When the run through was taking place, all crew were present and acknowledging all the instructions that I was giving to the actor. We then proceeded to rewatch these rough takes as a team. This helped a great deal as we could analyse each specific action e.g., eating a packet of crisps and throwing it away, taking out the hoodie from a bag and throwing the bag containing the uniform away.
After watching and analysing the run through, we made slight changes to improve the aesthetics and look and feel of the film, for when we filmed the next day. Hopefully, it would go smoothly as everyone knew what they were doing and we were happy with what we had decided to film. I made the final decisions but very much wanted everyone to be involved in the decision making and feel their contribution was valued.
Behind the scenes
Time-lapse film
I set up my GoPro to film a time-lapse so that I was able to capture the behind the scenes workings of filming. This allowed me to show the amount of takes it took in the filming process. It also provided an insight into the operations of the crew and how closely they needed to work together to reduce the risk of having to start the filming process again. The time-lapse proved this as each individual's steps and movement had to be planned in detail and then re-evaluated to decide whether it could be done in a smoother and more efficient way; this is clearly shown by viewing the time-lapse film.
I wasn't expecting the amount of time it would take to plan each movement of each crew member. If I had been working with a more experienced crew it would have been easier, as I wouldn't have had to explain every detail. I was teaching the crew as I was filming, which was time consuming but, it was an essential part of the process. It ensured every single crew member knew what they were doing and therefore gave the best chance of success.
The time-lapse film was also a good record of the difficulties we encountered concerning the members of the public getting in the way of filming. I had tried to problem solve this on location by posting a crew member to prevent people walking into shot and this can be seen on the time-lapse. Unfortunately, there is one instance at the end scene where despite the solutions to this problem being put in place 3 people can be seen in shot. I will need to edit them out.
Behind the scenes photos
Throughout the run through I tasked one of the crew to take photos to record and evidence the process. It was useful to look at these photos as they provided me with another view of the run through and a useful insight into how my film might look.
Promotional Ideas
|
|
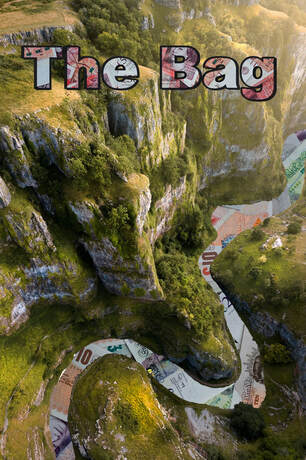
Promotional poster
I thought it would be effective and eye grabbing if I used an image of the gorge in the Mendips, where I based my film, for my poster. I found an image I was happy with and then added other aesthetic details. I decided to change the road with images of bank notes and used the same design in my title. I wanted to incorporate the image of bank notes into my poster, to give a link to my film and prompt my audience to question what the bank notes were doing there. However, I came up against a problem that I had not thought about which was that if I used the image I chose, I would encounter copyright issues. This was very frustrating as I has spent a long time developing my poster using this image. Despite this set back, I realised that I could use a number of my ideas from my original poster but, use them on a different image that was my own, to avoid copyright issues.
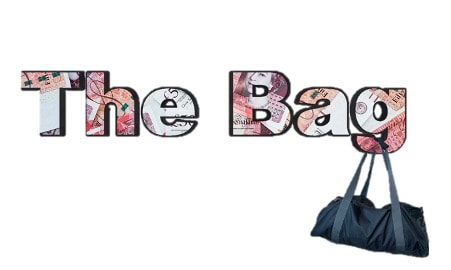
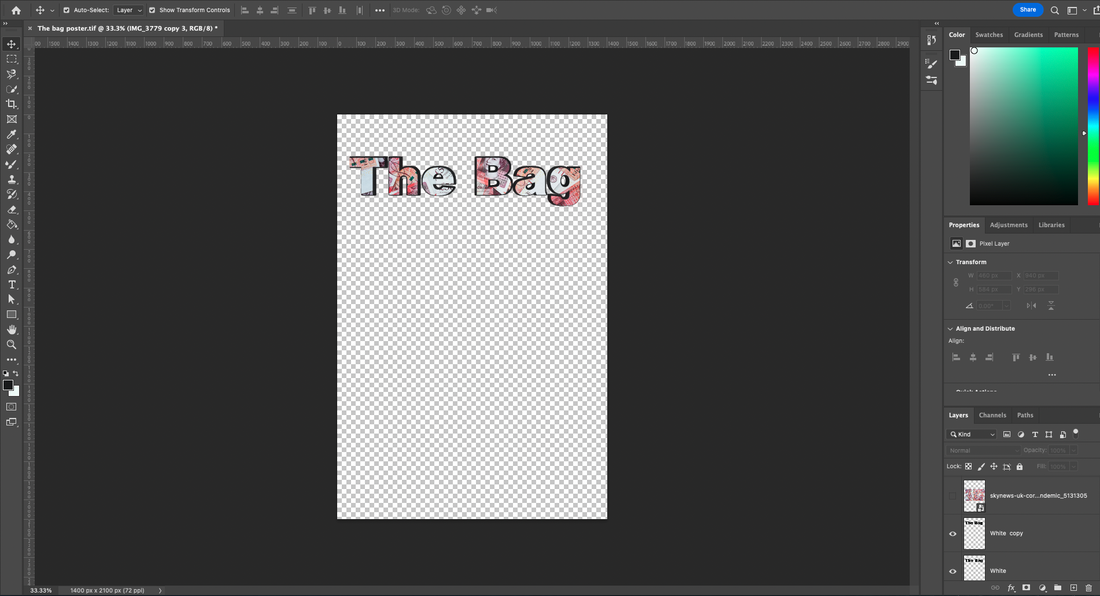
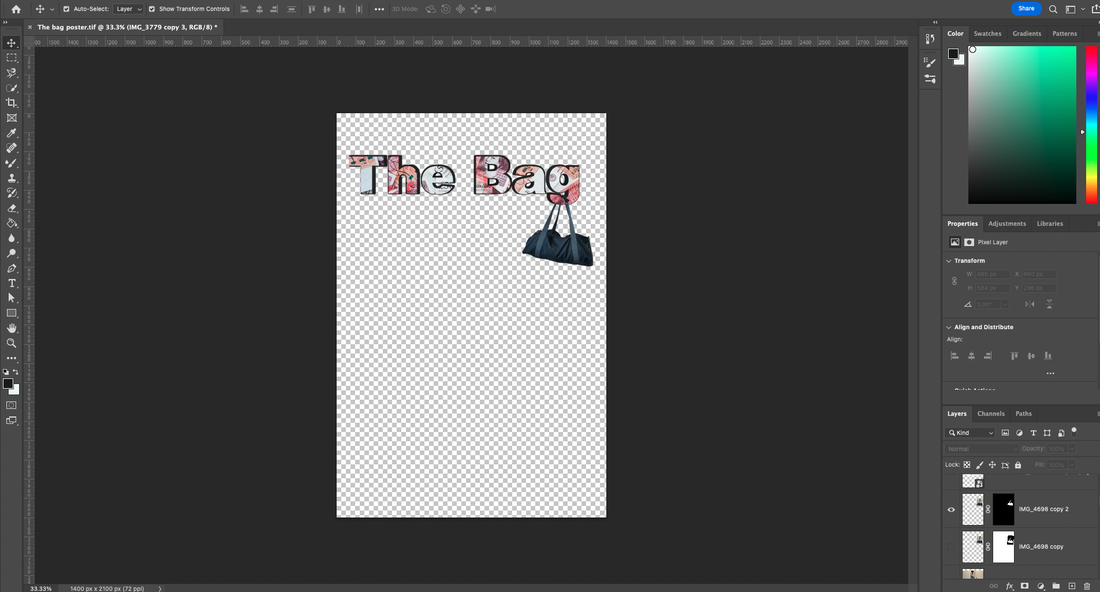
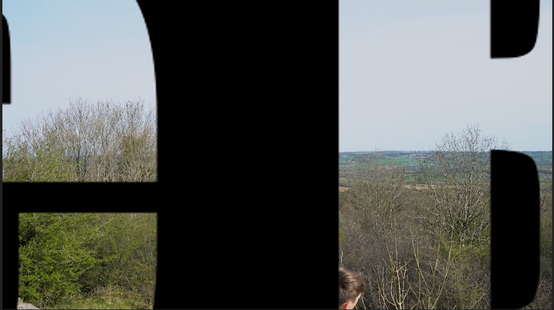
I wanted to further develop my title of my poster by making it stand out more. I made the lettering with a black surround which made it pop. I then had the idea of using an image of' the bag' in my poster to really create interest and questioning from my audience. After positioning the bag in a number of different places on my poster, I tried hanging the bag from the letter 'g' and really liked the aesthetic appeal. I also realised that hanging the bag off a letter made a link with the end of the film, where the main character holds the bang swinging over the cliff; rather like the image of the bag hanging from the tail of the letter 'g'.
I thought it would be effective and eye grabbing if I used an image of the gorge in the Mendips, where I based my film, for my poster. I found an image I was happy with and then added other aesthetic details. I decided to change the road with images of bank notes and used the same design in my title. I wanted to incorporate the image of bank notes into my poster, to give a link to my film and prompt my audience to question what the bank notes were doing there. However, I came up against a problem that I had not thought about which was that if I used the image I chose, I would encounter copyright issues. This was very frustrating as I has spent a long time developing my poster using this image. Despite this set back, I realised that I could use a number of my ideas from my original poster but, use them on a different image that was my own, to avoid copyright issues.
I wanted to further develop my title of my poster by making it stand out more. I made the lettering with a black surround which made it pop. I then had the idea of using an image of' the bag' in my poster to really create interest and questioning from my audience. After positioning the bag in a number of different places on my poster, I tried hanging the bag from the letter 'g' and really liked the aesthetic appeal. I also realised that hanging the bag off a letter made a link with the end of the film, where the main character holds the bang swinging over the cliff; rather like the image of the bag hanging from the tail of the letter 'g'.
These are the steps in the process I went through to develop the title for my promotional poster.
|
|
|
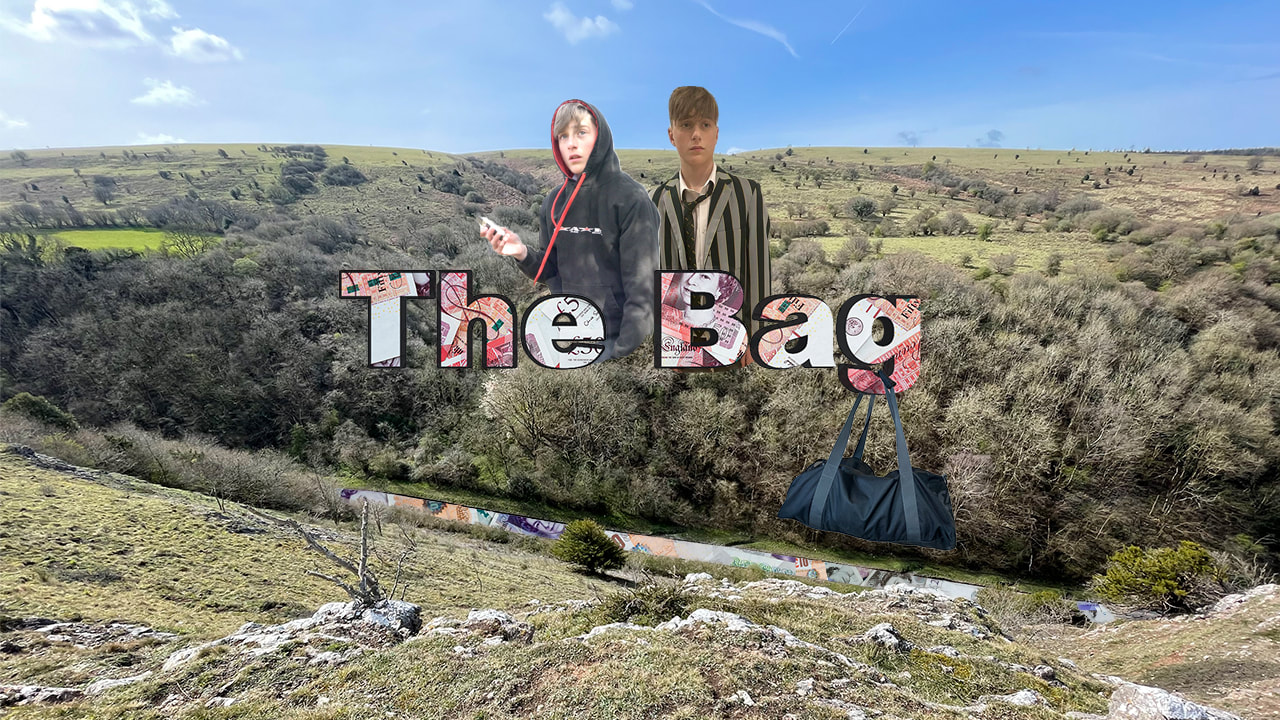
Final Promo Poster

|
|

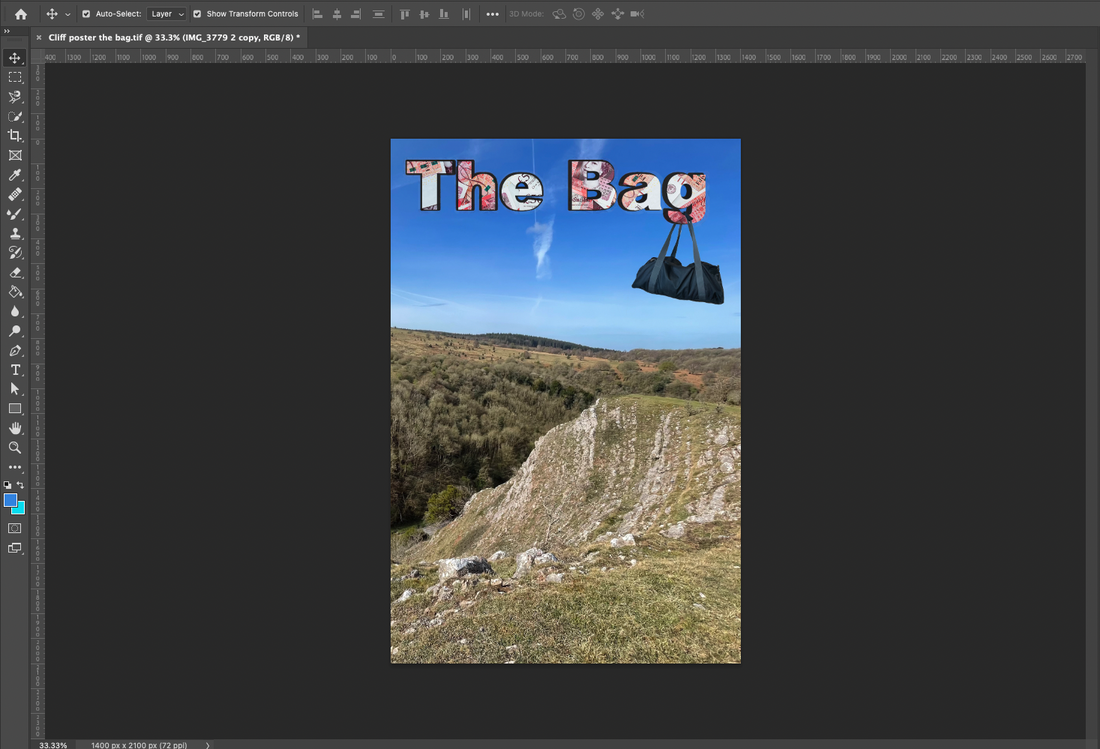
Baring in mind the copyright issues over my previous poster, I set about sourcing a suitable image for my promo poster. I wanted the same dramatic look and feel from my previous poster so, I selected an image featuring the dramatic cliff hanger location in my film. I then added 'The Bag' title that I had previously created. Although I was happy with this, I felt it lacked interest and enough connection to the film. I therefore added my characters on the edge of the cliff, to add suspense and hopefully to generate an interest in the film. I wanted my audience to question what is happening and why there are two people on the edge of a cliff; one of which is about to throw a bag over the cliff.
I really liked the connection that had been made between the hanging letter 'g' on the title and the image of the main character having the bag hanging over the edge of the cliff. I felt I had achieved a good link of ideas within the poster and to the film.
I sent my poster to my test audience for feedback. The results were positive.
Promo video development
First promo video
|
|
|
|
|

Second promo video
|
|

I have created my Promo Video to be accessible on every social media platform, to maximise the potential to reach viewers.
I knew before I started planning my promo video the sort of look and feel I wanted to create but, felt I needed to do further research into other film trailers and advertisements to gather some more inspiration. I really wanted something that was punchy and fast pace. I felt that advertisements that quickly flash images on to the screen were effective in grasping the audiences attention and I wanted to recreate something similar.
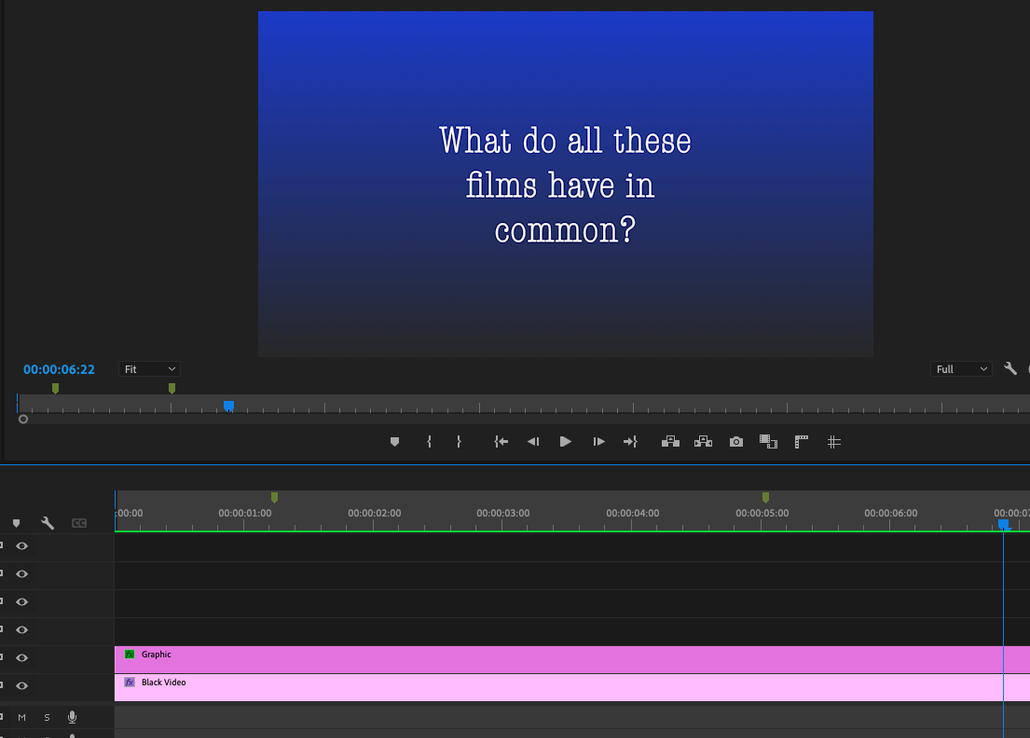
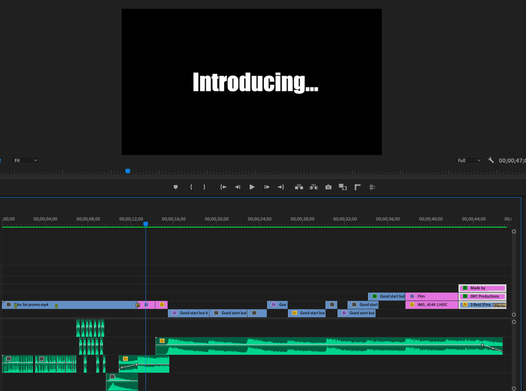
I researched one-shot films and used their promo posters which I then intended to quickly flash on the screen to grab the viewers attention. I next had to link these flashing images to my film and decided to use a question to engage the viewer. Instead of just putting text on the screen I felt it would be really engaging and different if I created a typewriter effect by animating text. I needed to research into how to achieve this effect and found it was not that difficult to do.The overall aesthetic effect of the typewriter text and audio more than achieved what I was trying to create and I was pleased with the overall effect.
Although I was really pleased with what I had created I felt that I needed to add more to my video to really have a ‘wow’ factor and to give my audience more information about my film; to entice them to watch it. I then decided to make an alternative promo video. I thought it would be effective to take still shots from my film and link them together however, I felt the result was quite boring and had no energy to help engage the viewer. So, I researched some more recent film trailers. The concept of the trailer for the film Boiling Point (2021) showcasing short clips of the film to give a taster of the narrative but also the one-shot style gave me some inspiration.
I also got inspiration from the trailer of ‘Operation Mincemeat’ (2022) as it was fast pace and suspenseful. (See Context and research page)
This led me to take snapshot clips of my film and link them together to give a flavour of my film; creating a similar effect to the Boiling Point trailer. I deliberately chose to place my clips in a semi random order at the beginning. I didn’t want to reveal too much of the story of my film and wanted to encourage my audience to be intrigued by my main character and want to know more. By replicating the style of trailer I chose, I aimed to present my viewer with a snapshot of my film that would intrigue and entice them into wanting to view my film.
I then showed both videos to a small test audience and gained the feedback- “ I can’t choose between them. Both videos are good alone but why not link them together? “ I immediately realised that they were right, by joining the two promo videos together I would have all the elements I was looking for; creating a fast pace, engaging trailer that would intrigue my audience and encourage them to watch my film. Unfortunately, I had shot the two promo videos on different formats which meant I couldn’t easily join them together. This meant a lot more work however, the end result is exactly what I was hoping to achieve so, it was worth putting in the time
Audience Feedback of Promo Video
(Click on text to access full screen version of feedback)
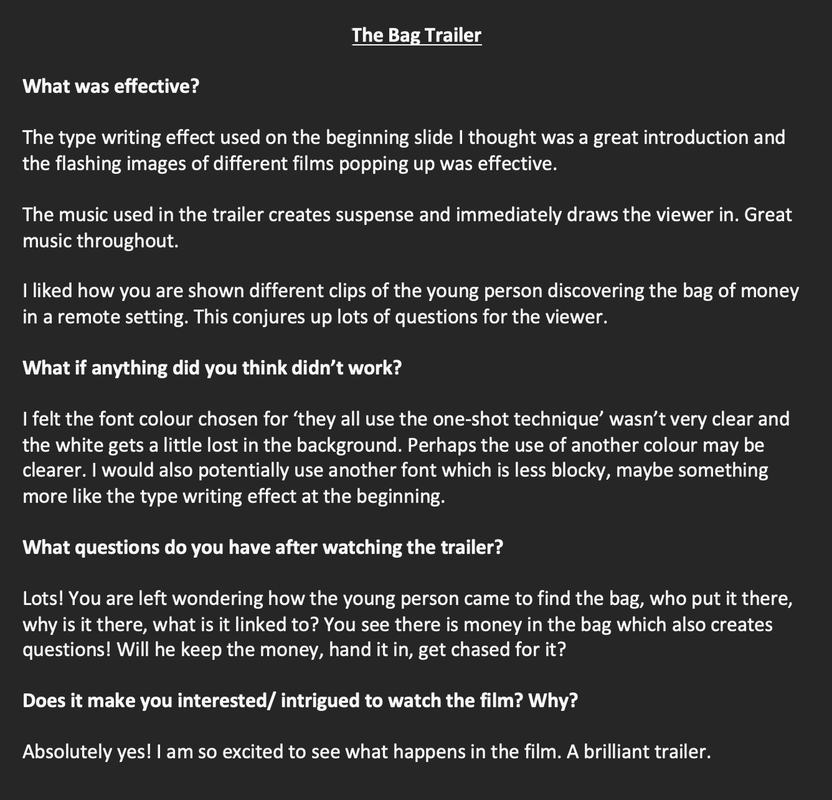
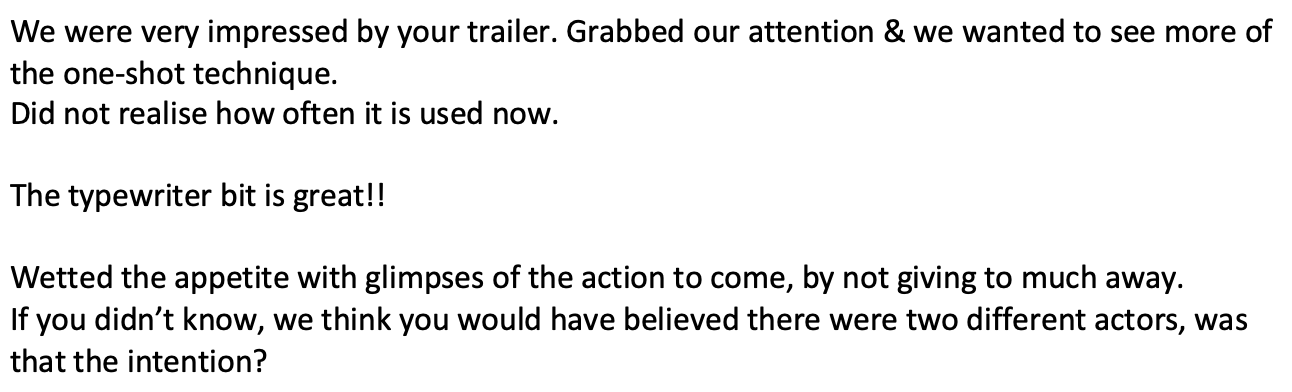
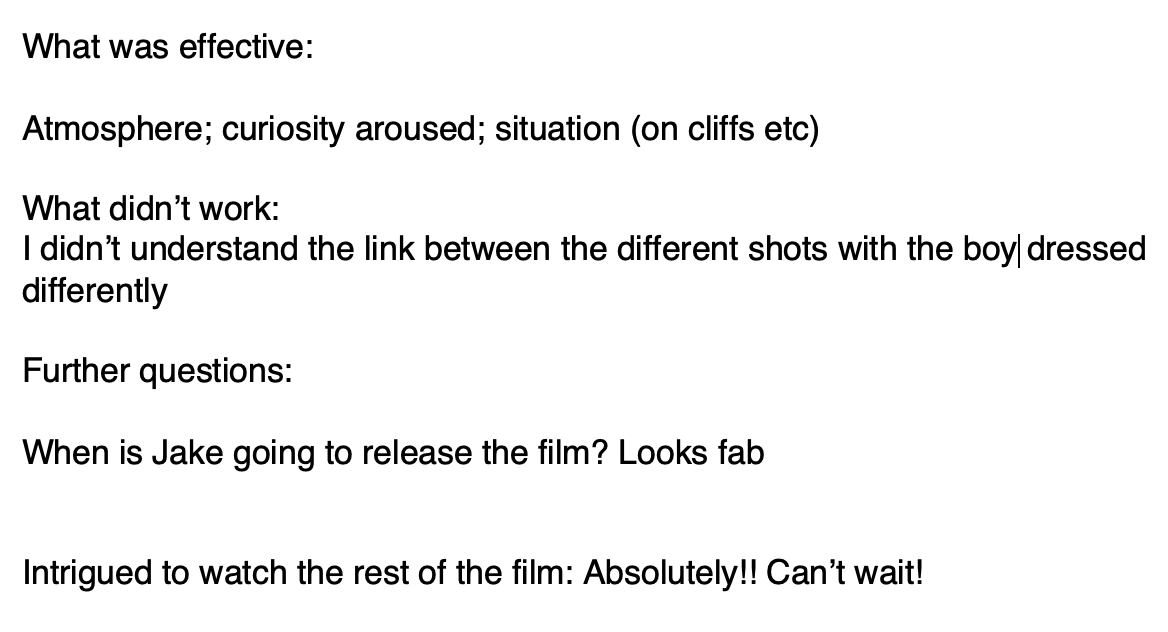
This feedback was useful and showed me that my audience was excited by the prospect of my one-shot film.
I took onboard the comment about the colour of the text getting lost and the type of font I had used. I experimented with the suggestions that had been made and increased the boldness of the type. However, I kept to my original text design as I was happy with how it looked and no-one else had commented on this.
I took onboard the comment about the colour of the text getting lost and the type of font I had used. I experimented with the suggestions that had been made and increased the boldness of the type. However, I kept to my original text design as I was happy with how it looked and no-one else had commented on this.
Thumbnail
For my thumbnail, I decided to carry across the branding of my film which was "The Bag" text and to feature once again the "wow' factor of my location. I also featured my main character, but included two different images of him, to create curiosity in my audience of the story. I was pleased with my final thumbnail.
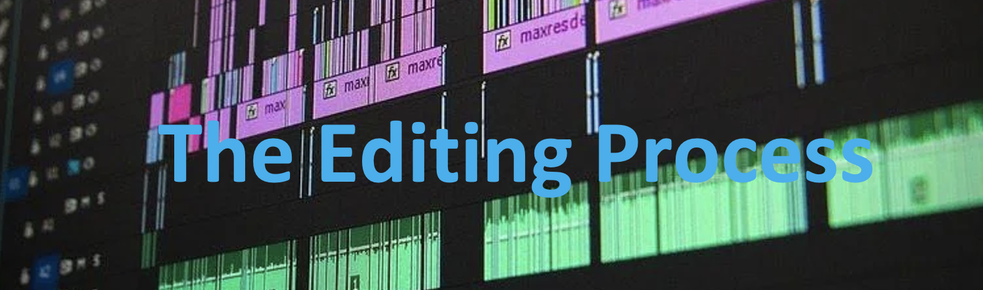
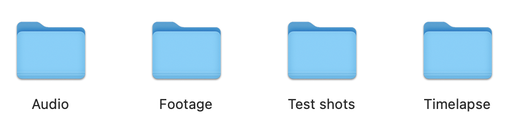
Sorting out footage and audio
|
|
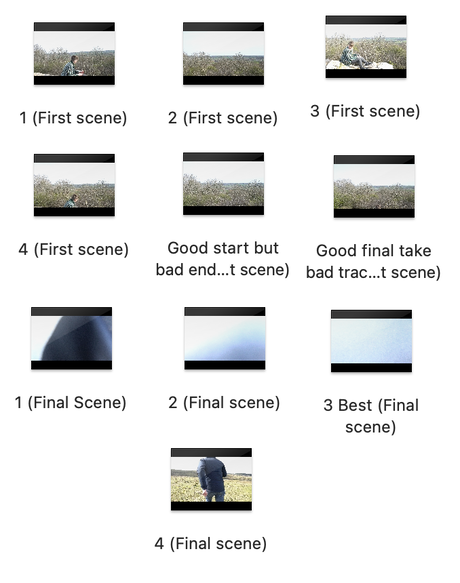
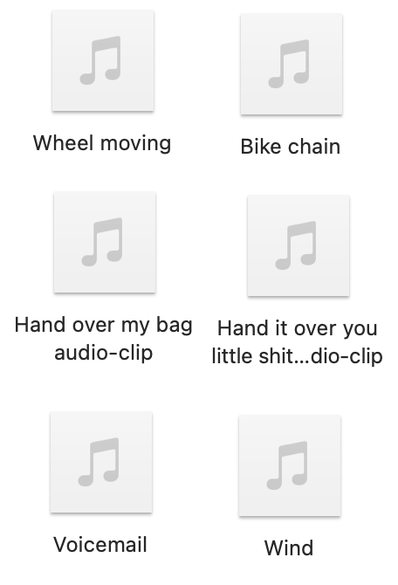
I sorted my footage and audio by identifying which clips were suitable for use. I then named them so that I was able to easily identify which clips were the correct ones when it came to editing. This was a useful exercise and made me feel more organised when I started the process of editing.
Placing footage in timeline
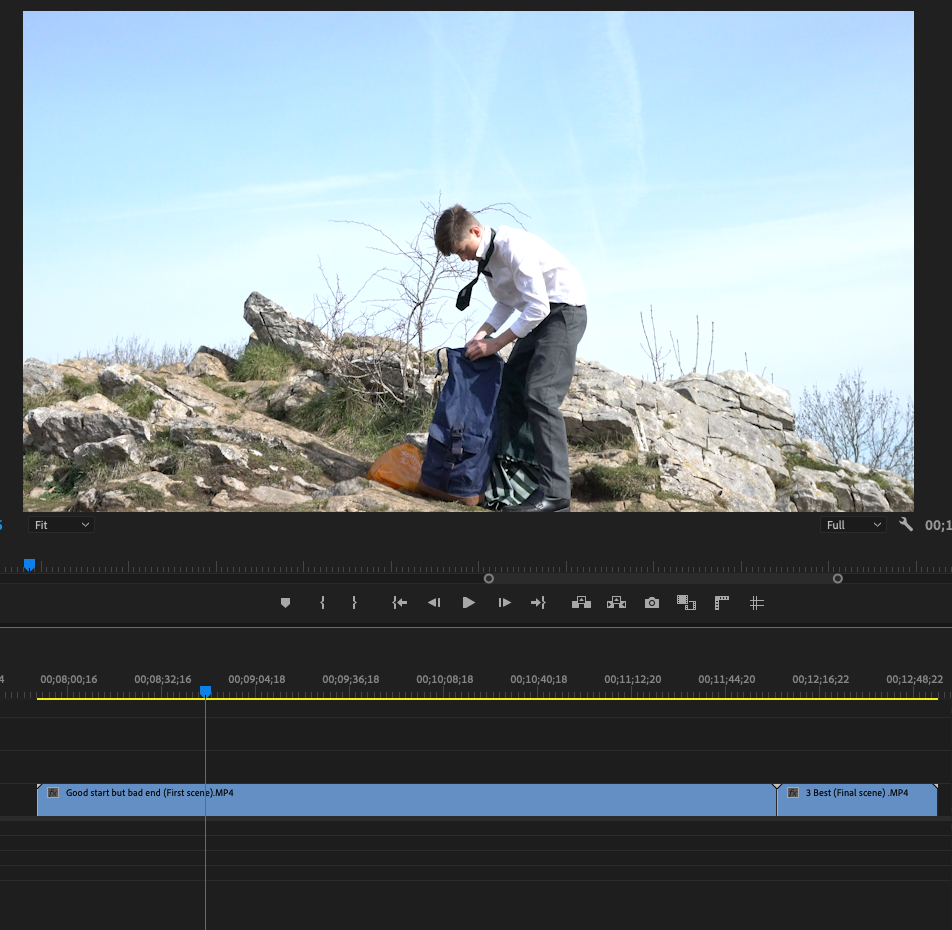
I placed my unedited footage into my timeline making sure I had the correct clips. This was useful for me to view my two sets of footage independently and identifying what editing had to be done.
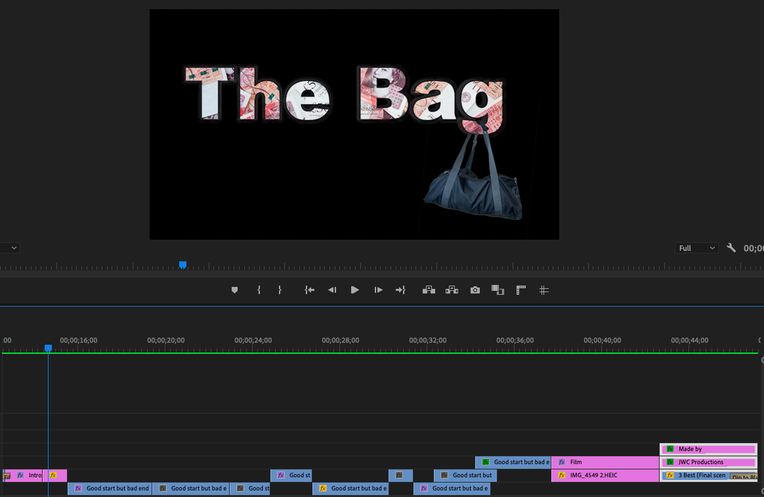
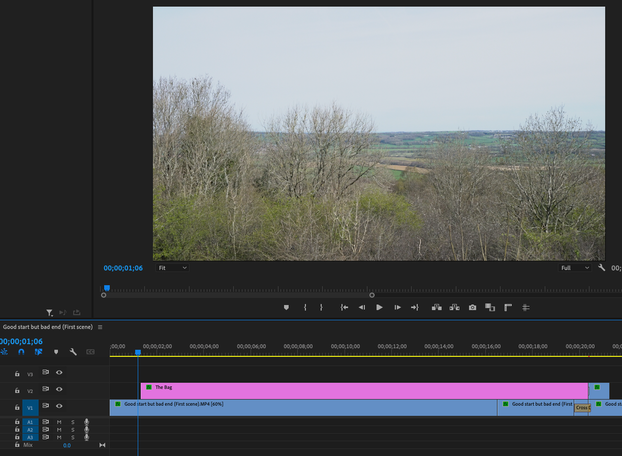
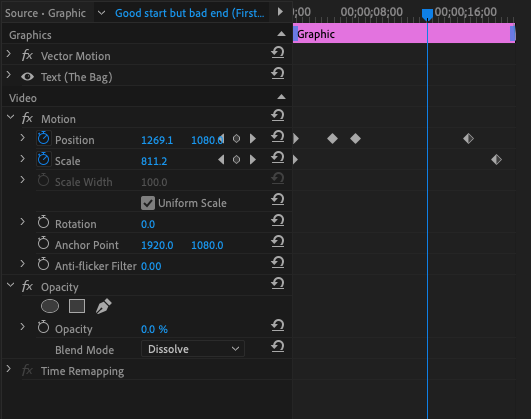
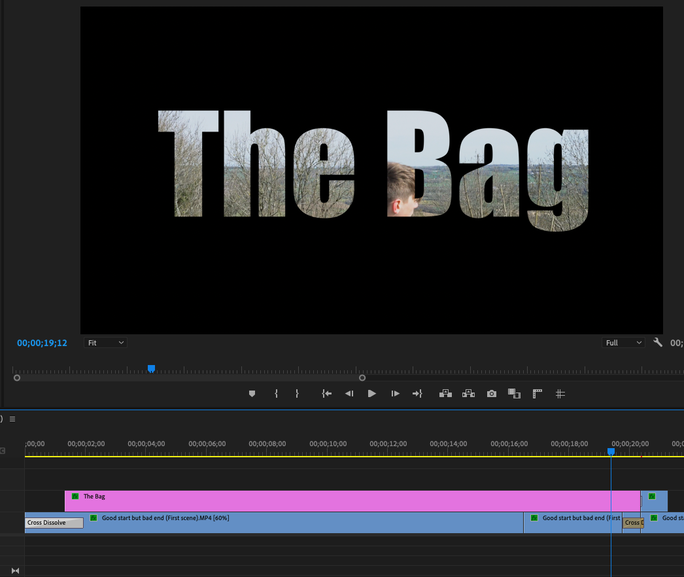
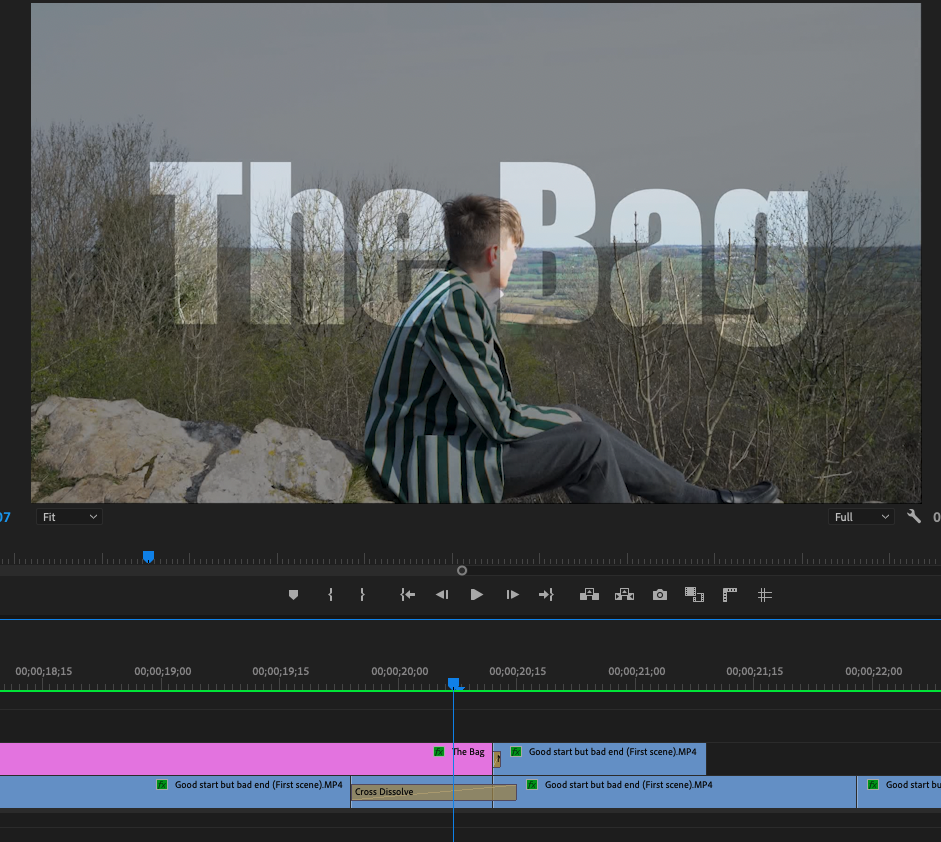
Opening text edit
|
Title scale speed control
|
Tiltle position control
|

|
|
(See context and research page for explanation of the process I undertook to achieve this)
|
|
Final footage edit
|

|
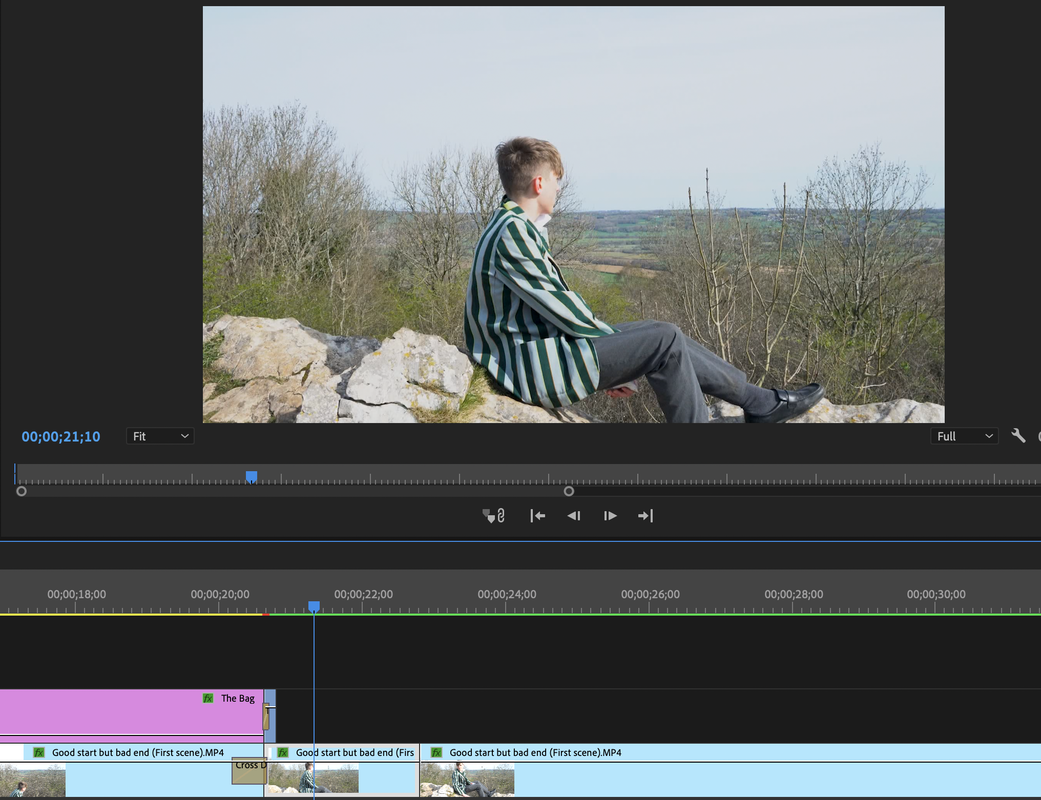
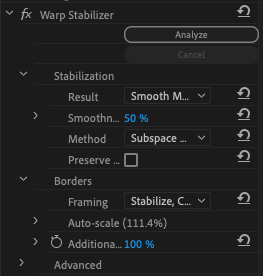
Editing the footage that came after the opening text scene presented me with a new challenge. When I viewed the clips I was aware that there was a slight shakiness as the camera made its way down the hill and affected the aesthetic look of my film. I solved the problem by adding an effect called warp stabiliser which smooths out any shakiness in the footage. My next task, after finding the solution to shakiness in shots, was to go through all the other footage and identify any other shaky parts.
After completing this, I then realised I had an issue concerning the scale of the clips that didn’t have the added effect. I resolved this by key framing the footage to slowly scale in to match the neighbouring clips.
After completing this, I then realised I had an issue concerning the scale of the clips that didn’t have the added effect. I resolved this by key framing the footage to slowly scale in to match the neighbouring clips.
Masking of unwanted public
|
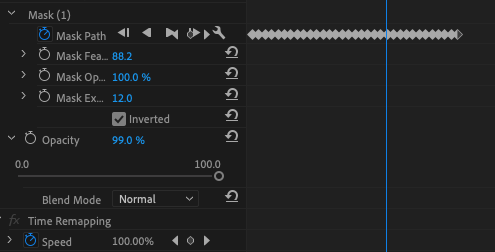
|
(See context and research page for explanation of the process I undertook to achieve this)
Audio edit
Bandlab www.bandlab.com/mix-editor
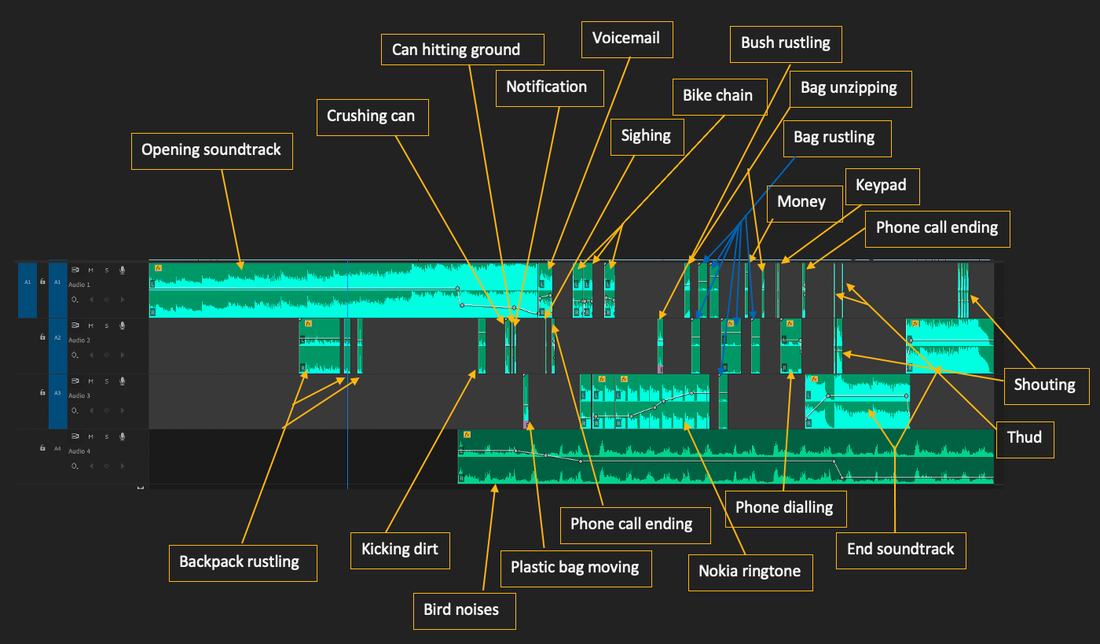
I knew that ultimately, the audio would be key in consolidating my film into a finished product; as when viewing my rough cut without audio, it lacked the element of suspense and character progression which is essential in a one-shot.
It was suggested to me, by one of my lecturers, that maybe I could create my own soundtrack for my film by using the online tool called Bandlab. I did attempt to create one, bearing in mind that this concept was brand new to me and I had no prior experience of composing. However, after spending a number of hours struggling to create even a basic tune I decided that I didn't have enough experience to continue. Also, when the idea was suggested, the timeframe in which I had to complete the soundtrack was minimal. I therefore made an executive decision that my time would be better spent focusing on producing my own individual foley, as this played to my strengths and experience.
It was suggested to me, by one of my lecturers, that maybe I could create my own soundtrack for my film by using the online tool called Bandlab. I did attempt to create one, bearing in mind that this concept was brand new to me and I had no prior experience of composing. However, after spending a number of hours struggling to create even a basic tune I decided that I didn't have enough experience to continue. Also, when the idea was suggested, the timeframe in which I had to complete the soundtrack was minimal. I therefore made an executive decision that my time would be better spent focusing on producing my own individual foley, as this played to my strengths and experience.
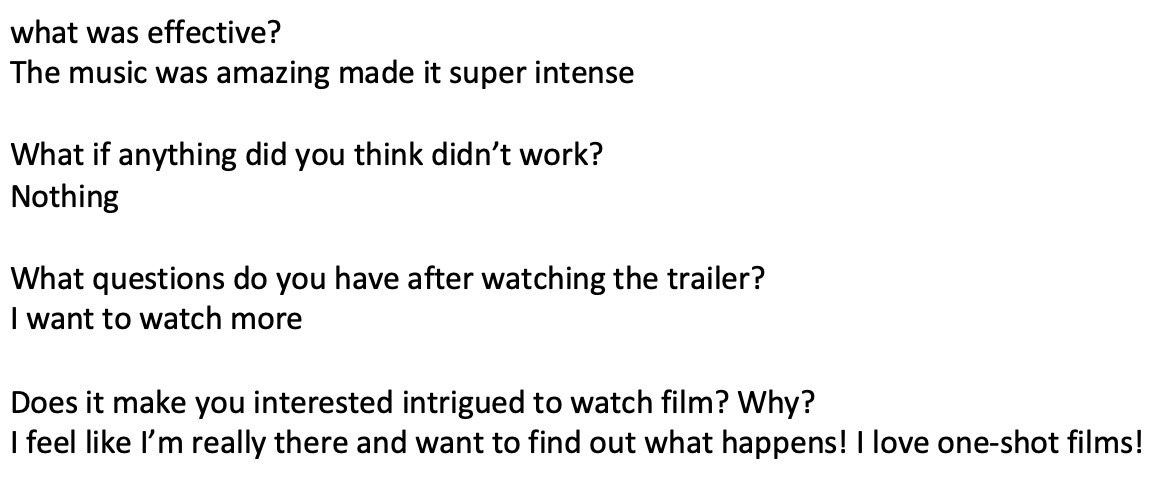
Audience feedback
(Click on text to access full screen version of feedback)
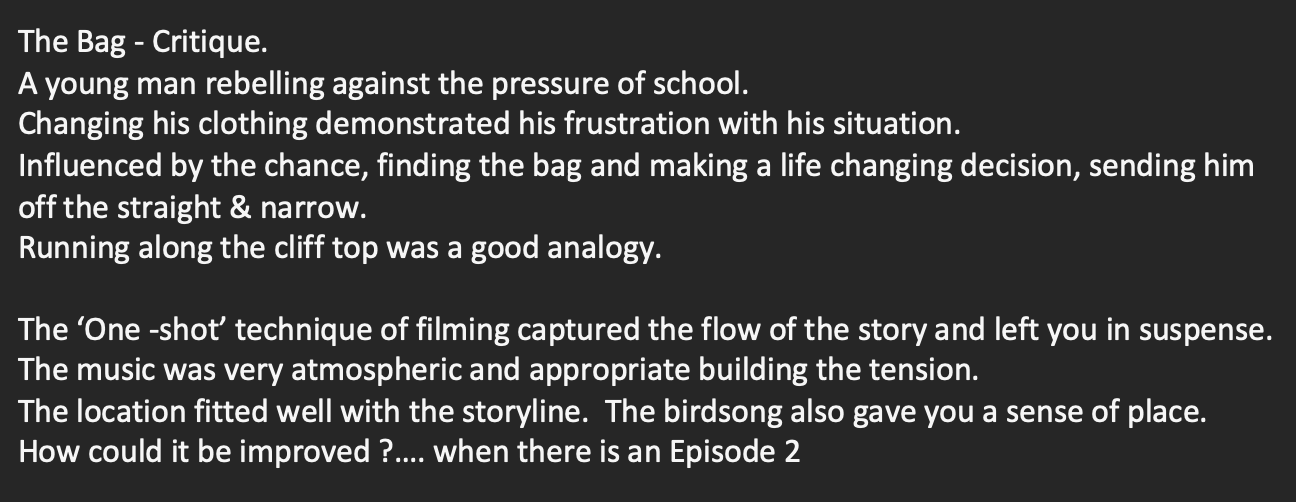


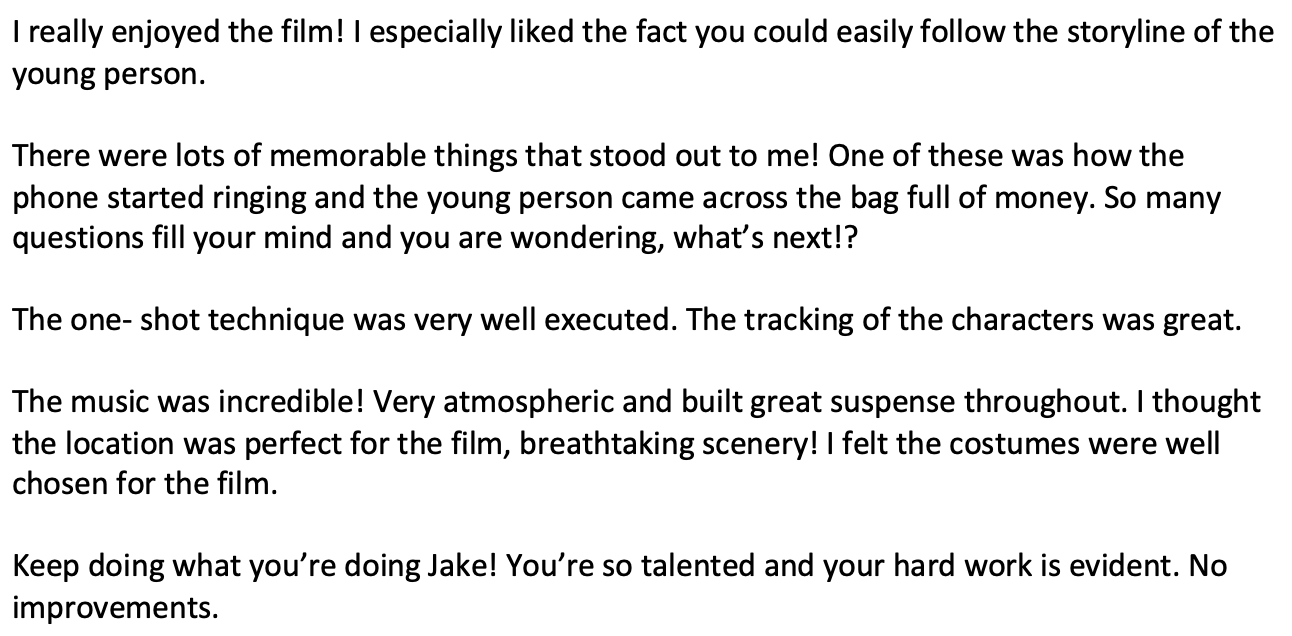
This feedback was incredibly reaffirming to me as all my test audience commented about immersion in the character and the location. They were also filled with suspense as the storyline evolved and a number of people wanted to know what happened next. This was exactly the effect on the audience I was aiming for.
